
About the Todoist API
Todoist is a task management tool that makes it super easy to create lists of tasks, track your projects, and manage your to-dos all in one place. The API allows you to automate the creation of tasks and projects as well as getting notified when tasks are completed, among others.
Quickstart guide to the Todoist API
The easiest and fastest way to start using the Todoist API is with a free Workload account. By signing up for Workload, you can have access to the entire Todoist API library including all webhooks (triggers) and actions including deletes. Start your free account by signing up here .
Step 1: Sign up and create a new workflow
Once you’ve logged into your free account (3 clicks), click on the “Create New” button in the left sidebar navigation menu:

Step 2: Add the Todoist API
Click on the trigger app to open the trigger selection menu. From the “Search for an App” pane, type “Todoist” as the trigger app.

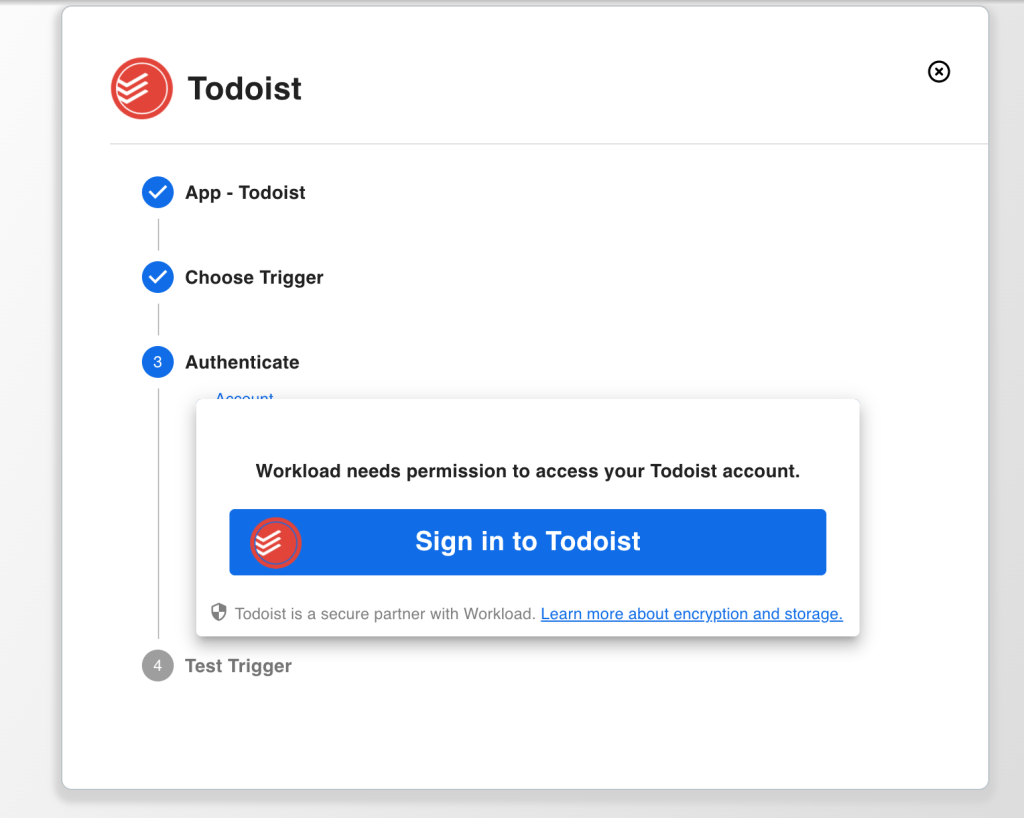
Step 4: Authorize your Todoist account
After selecting Todoist app and pressing the “Next” button, add the proper authorization. This allows Workload to make API calls on your account’s behalf. This is a necessary step to use the Todoist API and to build automated workflows and integrations using Todoist.
Click on “Add New”
Step 5: Choose the trigger
A trigger is an action that causes a workflow to execute. It is some kind of change inside of the Todoist application. It is the starting point of the task you want to automate.

Step 6: Test the trigger
This is the fun part! After selecting your trigger, go to your Todoist app and “do the thing” that would execute a change in your account. If you select “New Task Created” as your trigger, you should go to Todoist and create a new “Task”. The changes will now reflect inside of Workload. This data will now become available to use in future steps of your workflow.
Note: The workflow will temporarily turn to “ON” while listening for changes to your Todoist account.
Save and close the trigger step by clicking the “Save & Close” button.
Step 7: Add an Action
Add an “Action” to your workflow. Actions occur after the trigger happens. You can add an Action step that will automatically create a Task in Todoist using dynamic data from the original Task that started the workflow.
Create an action by clicking on the “Click to Add Action” action step.

Supported Todoist API Triggers
Task Created
Triggers when a new task is created
Project Created
Triggers when a new project is created
Supported Todoist API Actions
Add a New Project
Creates a new project
Get all Projects
Retrieve a list of all your projects
Create a New Task
Creates a new task
Get Active Tasks
Retrieve a list of all active tasks
Part 1 of Recruitment Workflow Automation for our Clients
Intro and Background
Atrium is a legal-tech startup based in San Francisco, CA. Their recruiting team came to Workload to get help with a few tasks under the Recruiting Coordinator job. With the massive growth they’ve experienced recently, it was time to explore the world of recruiting automation. This would make way for the current team to focus on higher value work instead of the mundane manual tasks.
Every company has their own DNA that makes them special. Atrium is no different. If we could automate the “special” tasks, it would free up the Recruiting Coordinator to focus on critical thinking skills the job requires.
That’s where we stepped in! We love to automate random complicated tasks. After sitting down with the team for a few days, we decided to automate some of the document creation tasks that a Recruiting Coordinator does.
What are Recruiting Automation Tools?
These are the tools which are usually built in to your applicant tracking system (ATS) that you should be using when hiring. Every company has a different recruiting process, but that process should be focused around recruiting automation. Again, we can’t stress this enough: the more time you free up for your recruiters, the more time they have to do what you’ve hired them to do: hiring employees.
How much of your recruitment process should be automated is entirely up to you? For Atrium, they want to achieve up to 75% automation and this was just the beginning. Workload’s team knew that if we could automate the panel printout (a complicated document with many different if, then scenarios), we could likely automate almost anything.
By expanding the scope of their role, recruiters are looking for ways to automate and scale the administrative tasks. It’s about working smarter, not harder, and focusing on the people, not the process.
Recruiting Automation: What We Automated
One of the “special” time consuming tasks that an Atrium Recruiting Coordinator does is called the “Panel Printout.” This is a one-pager showing the on-site schedule of the interview panel. It takes a newly hired coordinator about 20 minutes to create the print-out because it requires a headshot of each interviewer, their job title, and interview times.
Since they were in process of hiring a new Coordinator (yay growth!), we thought this was the perfect job for Workload to tackle. A new hire would have no idea what job titles people have, they barely know anyone’s name!
Recruiting Automation is perfect for a company in this phase. You are growing so fast that you need to hire more people, but to hire more people you need to free up your recruiting team’s time so they can focus on hiring (instead of drawing panel printouts!).
How We Automated the Recruiting Process
Luckily for us, Atrium uses Lever.co as their applicant tracking system. Lever’s strong API feature set, plus their event webhooks meant we were ready to roll. This made recruiting automation processes even simpler for us. Thank you Lever!
We utilized Lever’s webhook for candidate stage change. This means that when a candidate moves to a new stage, we would receive a notification. We only cared about the stage ID associated with “Onsite Interview”. Once we received the webhook for “Onsite Interview”, our process and workflow automation software took over.

Gathering the Data
Once we received the right webhook, we used the candidate’s Lever ID to retrieve their panel information. Using Lever’s API, we could make an easy call to their service to retrieve the JSON data of a candidates panel once it was created.

The next step was to grab the employee/interviewer’s photo, Lever ID, and job title from an Airtable base. Luckily for us, Atrium already used Airtable and we could easily grab the data we needed. In the future, we will automate this step too by grabbing from ADP and Envoy for titles and photos. This helps automate when new employees are onboarded or old employees are promoted.
After we gathered the interviewer’s name, title, and photo, we then merge the data with Lever API data to start building the “Panel Printout”.

Once the data was merged from Lever and Airtable, we needed to make and write a JSON file to store on server. We need to store this data to reference in the final step, which is building an HTML5 template.
The HTML5 template is a simple image gallery with a title. The title indicates the date and name of the interviewee coming on-site for their interview. We utilized an open-source tool called JSON2HTML to read JSON data and inject into HTML pages. Super helpful in the exercise!

What’s Next for Recruiting Automation?
With Atrium being such a great partner to work with, and a great use-case provider, we see a huge potential in other areas of the recruitment process we can automate. Currently, we are exploring ways to further optimize their candidate screening, interview feedback, onboarding, and offer letters (more document creation!).
If your business is buried in the weeds when comes to hiring processes, it’s time to consider HR process automation. If your team is tired of doing legwork and manual tasks, it’s worth the 15-20 minutes it takes to explore your first automation app. Workload is here to help you. We are experts in the new age of automation for HR tasks.
Our belief is that those who join in on the automation revolution will be the businesses that last. Those who don’t will continue to suffer from an exhausted and demoralized workforce.
Conclusion
We couldn’t be happier with how this automation sequence turned out for Atrium. The recruiting team was thrilled with how fast and easy it was to start automating something they felt was impossible to do. That’s all thanks to our customized software that can be integrated with any 3rd party API service.
The final result is a custom HTML webpage that is self-hosted. Atrium uses that web page to dynamically save and print a PDF. The recruiting team hands that PDF to their candidate as a welcome greeting.
This process makes the candidate interview experience better by making the person coming on-site feel special. You could say Workload has automated the candidate on-site experience for Atrium!
Whether you are just getting started in your process automation journey or are looking to expand upon your current recruiting process automation setup, talk to us by dropping your email below. We won’t spam you. We just want to set some time to learn more and see if there is a fit to work together in the future.
Start automating your recruiting tasks with Workload
Create an automated workflow with Workload’s easy to use no-code drag and drop tool to connect your Kucoin Futures API data to Google Sheets.
Automate your Kucoin Futures trading operation and easily setup dashboards and custom monitoring systems in Google Sheets. Create your own custom Kucoin Futures API and Google Sheet integration in minutes.


Make your life easier with your own integration between Kucoin Futures and Google Sheets
Using the power of no-code technology, Workload lets you automate workflows between Kucoin Futures and Google Sheets.
Get started right now for free. Paid plans starting at $49/mo and scale with your usage. Receive expert guidance and onboarding to build your perfect workflow. Automate your crypto trading operation. Create custom dashboards and alerts.
How to Integrate Kucoin Futures with Google Sheets in just a few clicks
- ✅ Authenticate Kucoin Futures and Google Sheets
- ✅ Select a trigger that will kickoff the workflow
- ✅ Choose the action you want to complete
- ✅ Map the data fields you want to pass from one app to the other
- ✅ If you get stuck, we’re here to help! Request help in our expert automator service market.
Step 1: Create A New Workflow
Log into your workload.co account and create a new workflow by clicking the big blue “CREATE WORKFLOW” button in the top left corner. If you don’t already have an account, go to https://automate.workload.co/auth/signin and create a free account. There’s no cost to get started.

Step 2: Name your Workflow and Setup the Trigger Node to pull data from Kucoin Futures API every minute and store the data in Google Sheets
First, click into the Title section in the top bar and type in a name for your workflow i.e “Kucoin to Google Sheets.”
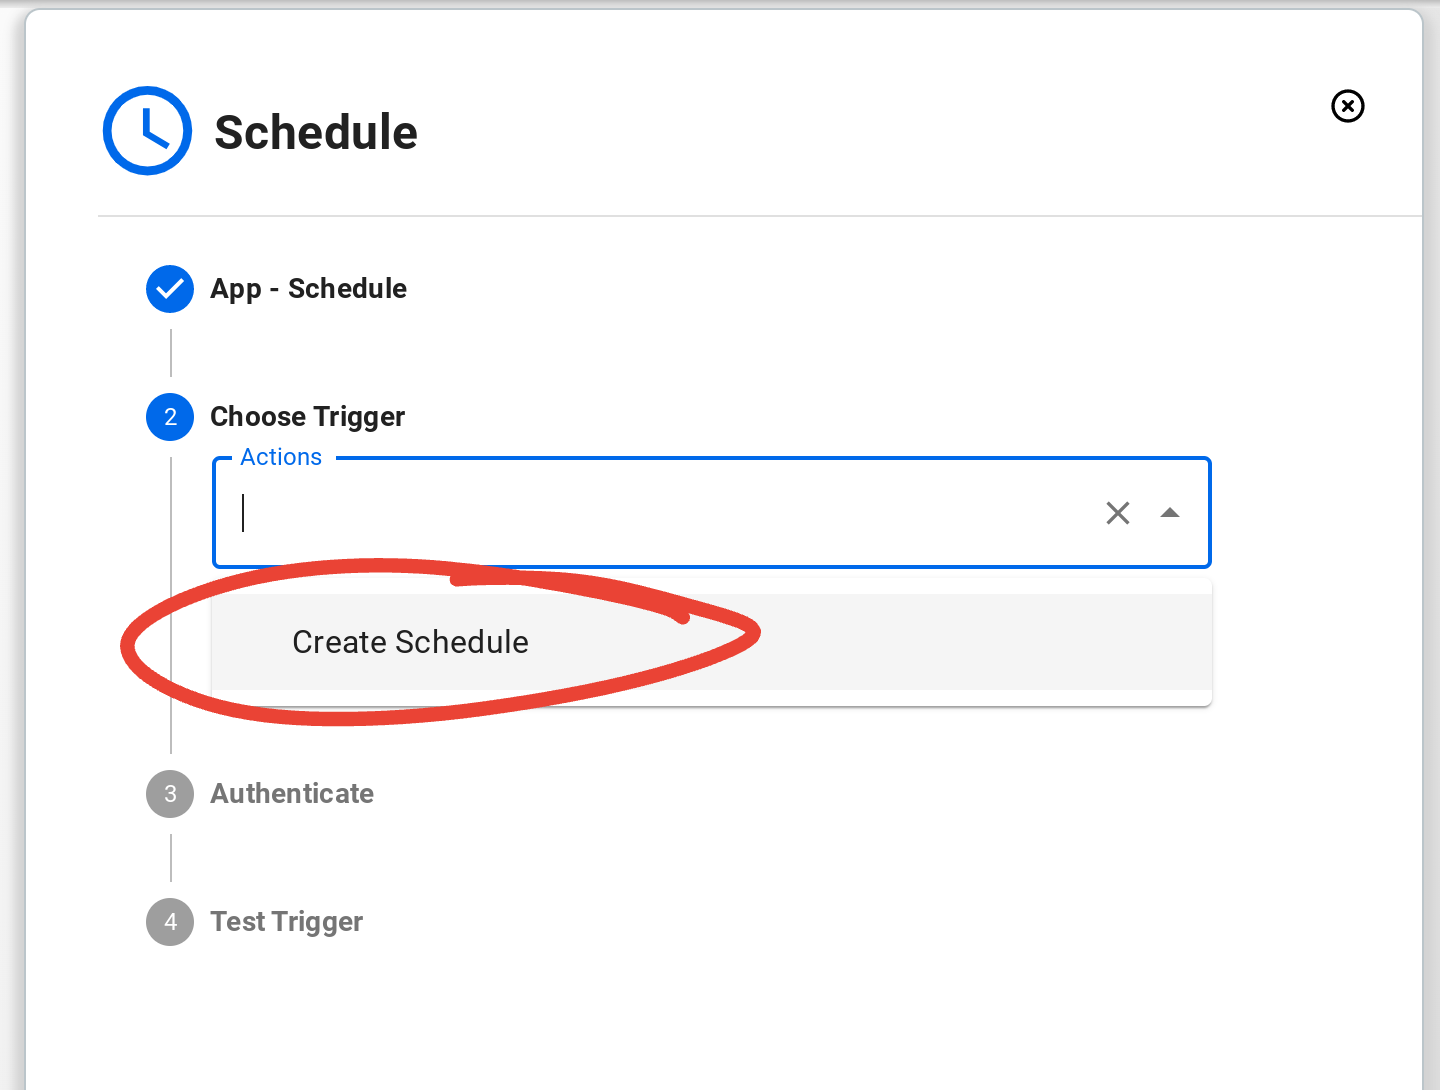
Second, click the Trigger Node that says ‘Click to Add Trigger’ to open the Trigger setup and configure a task scheduler so that we can fetch the Kucoin Futures data every minute.

Once the “Add Trigger” dialog opens, choose the ‘Schedule’ trigger. The schedule trigger allows you to tell workload how often you want to fetch new Kucoin Futures data and send to Google Sheets.

Choose the ‘Create Schedule’ Action from the Step 2 – ‘Choose Trigger’ dropdown.
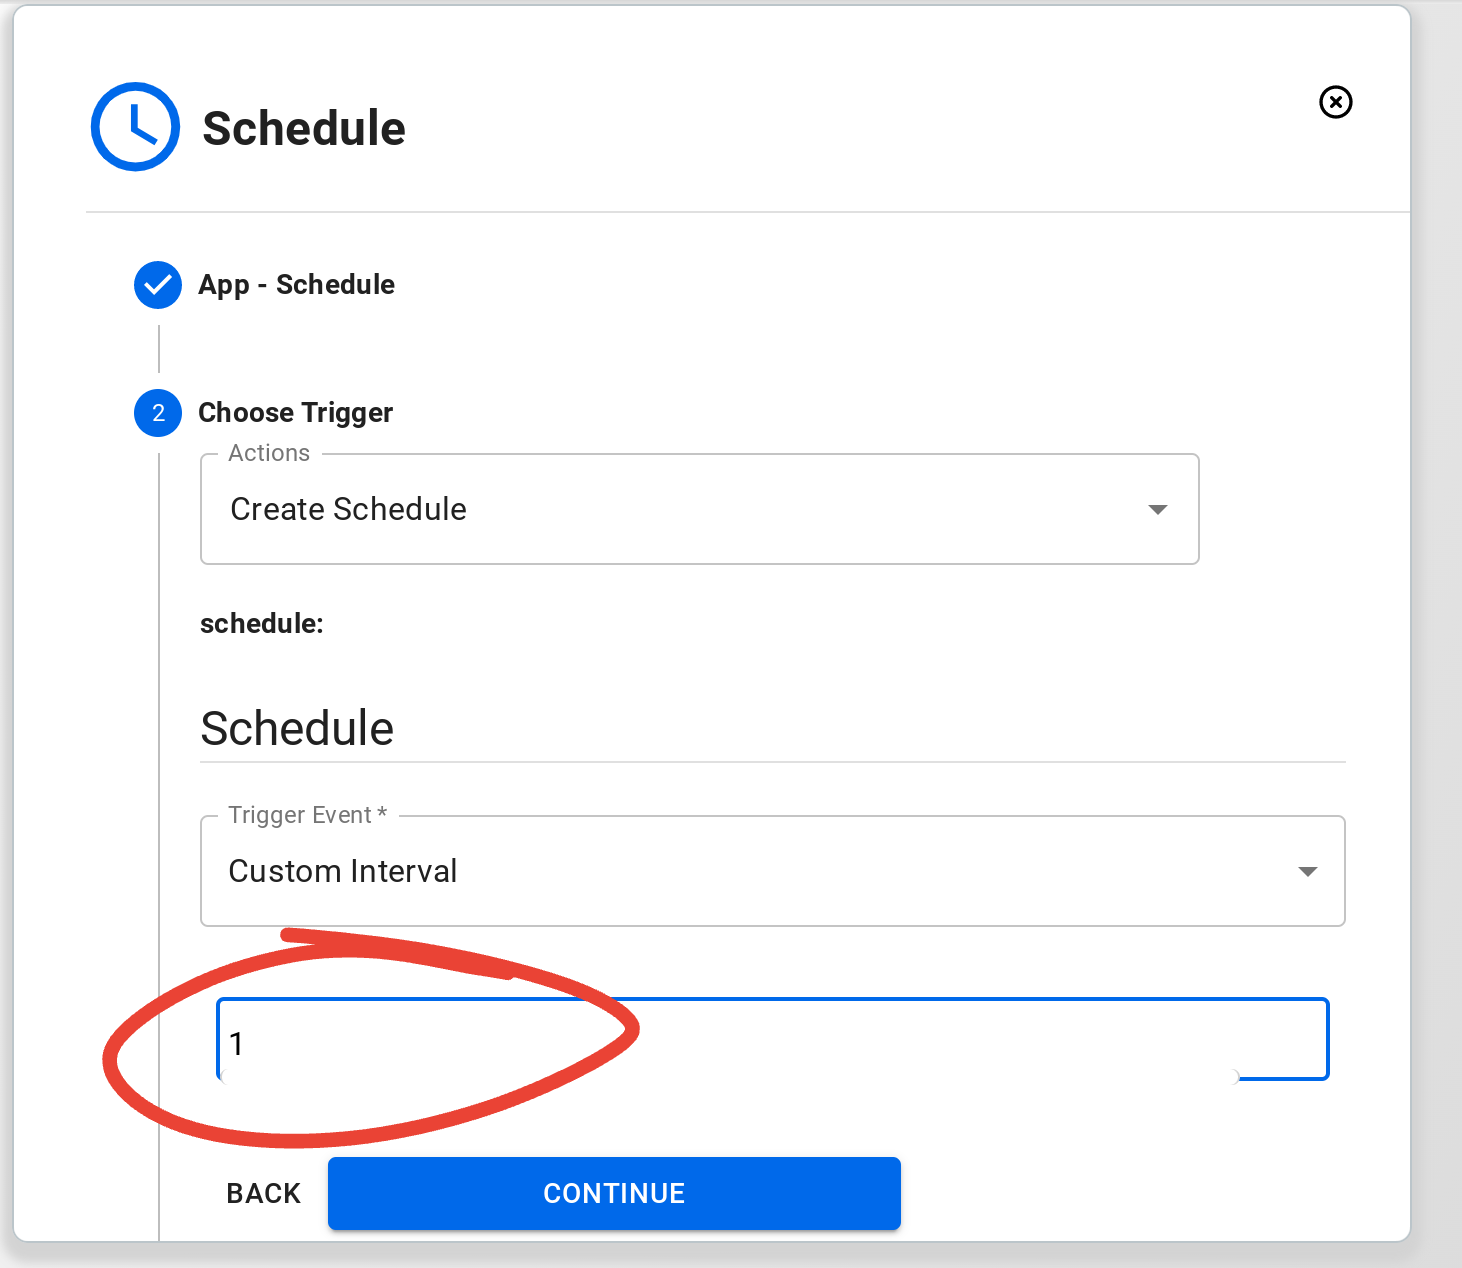
Choose ‘Custom Interval’ from the ‘Trigger Event’ dropdown.

Enter the interval, in minutes, indicating how often you want your Kucoin Futures API data to be pulled into Google Sheets. In this example, we will update prices every minute.
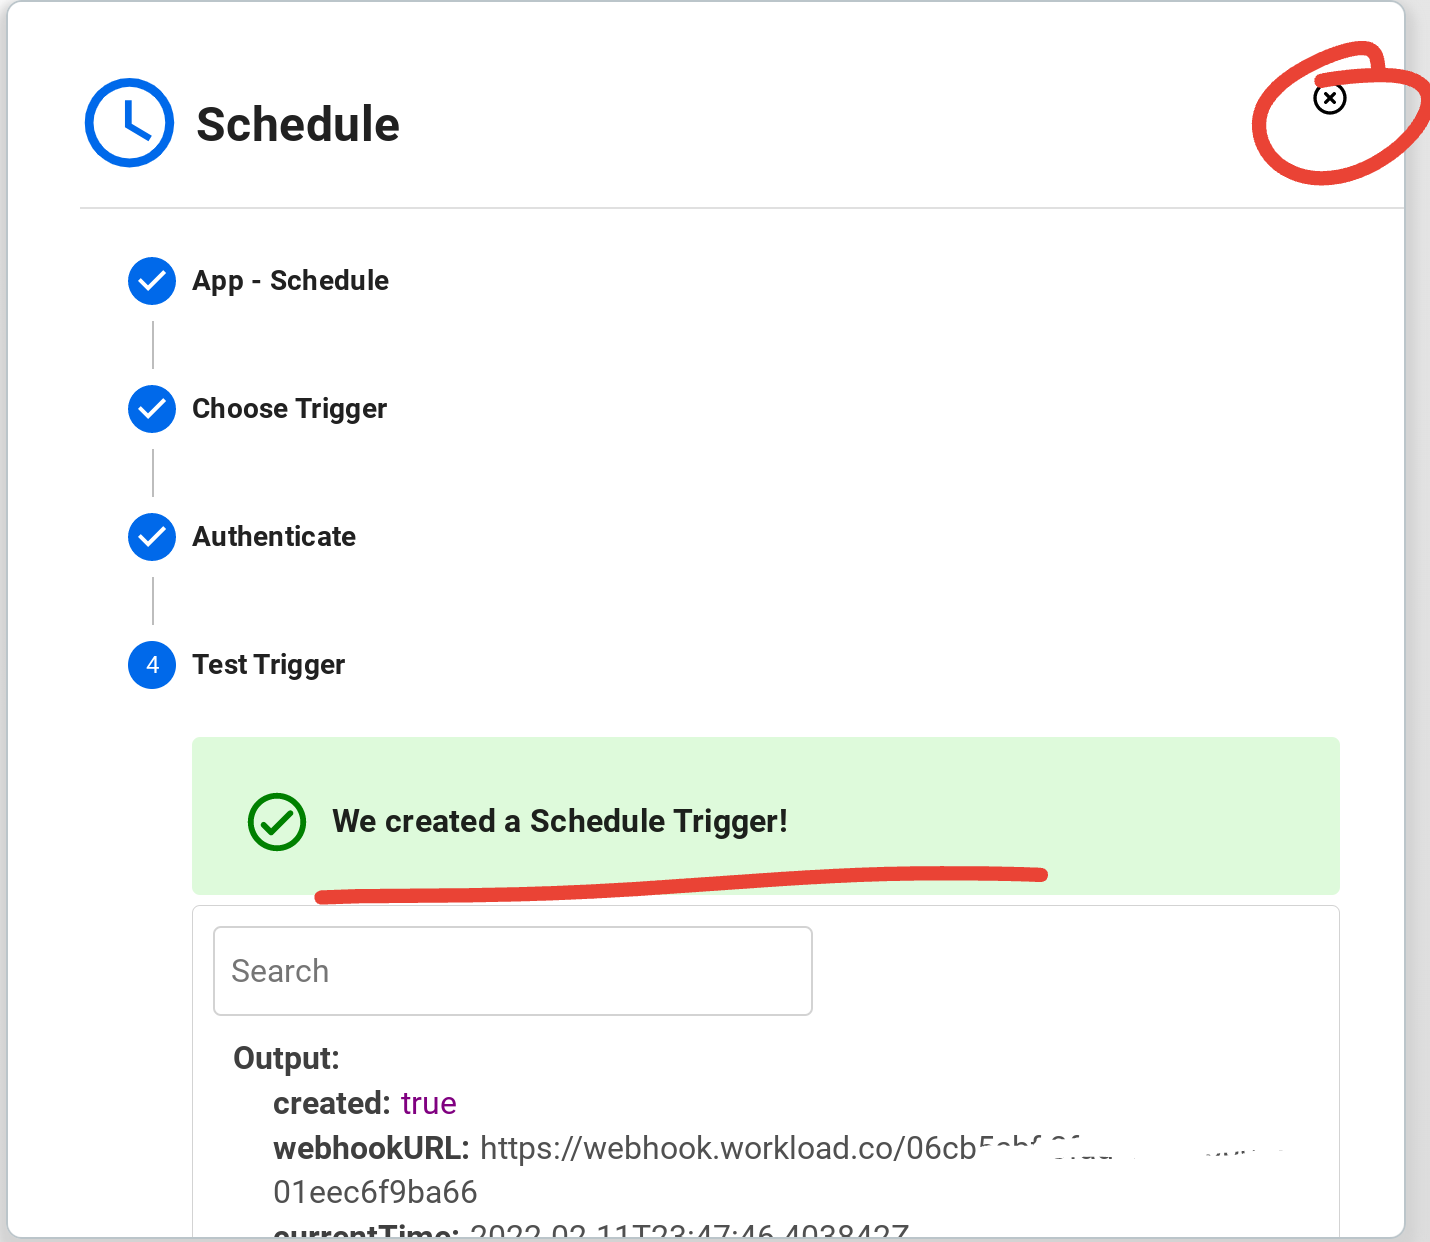
Click the blue Continue button, then wait for the green confirmation message “We created a Schedule Trigger!” to appear at the bottom of the screen. Congratulations! You’ve now completed setting up your Schedule trigger. You can now close the dialog by clicking the x circle in the top right corner.
Step 3: Setup the Kucoin Futures API Action Node to fetch data from Kucoin Futures
Click on the second node in the workflow titled “Click to Add Action.” This will allow you to configure the first step in your workflow that we’ve setup to run every minute.

Type in ‘kucoin’ to filter the list of apps and choose the Kucoin Futures API app from the list.

Choose “Custom Endpoint” from the dropdown. The custom endpoint is designed to be flexible and will allow you to make any GET request you want via the Kucoin Futures API.

Now go to the Kucoin Futures API site and look for the data that you want to fetch. We are looking for GET commands. In this example, we are going to pull the “Get List of Orders Completed in 24h” data. Copy the request path text after the GET in the HTTP Request section. For example here we will copy ‘/api/v1/recentDoneOrders’ to the clipboard so we can paste it in the next step.
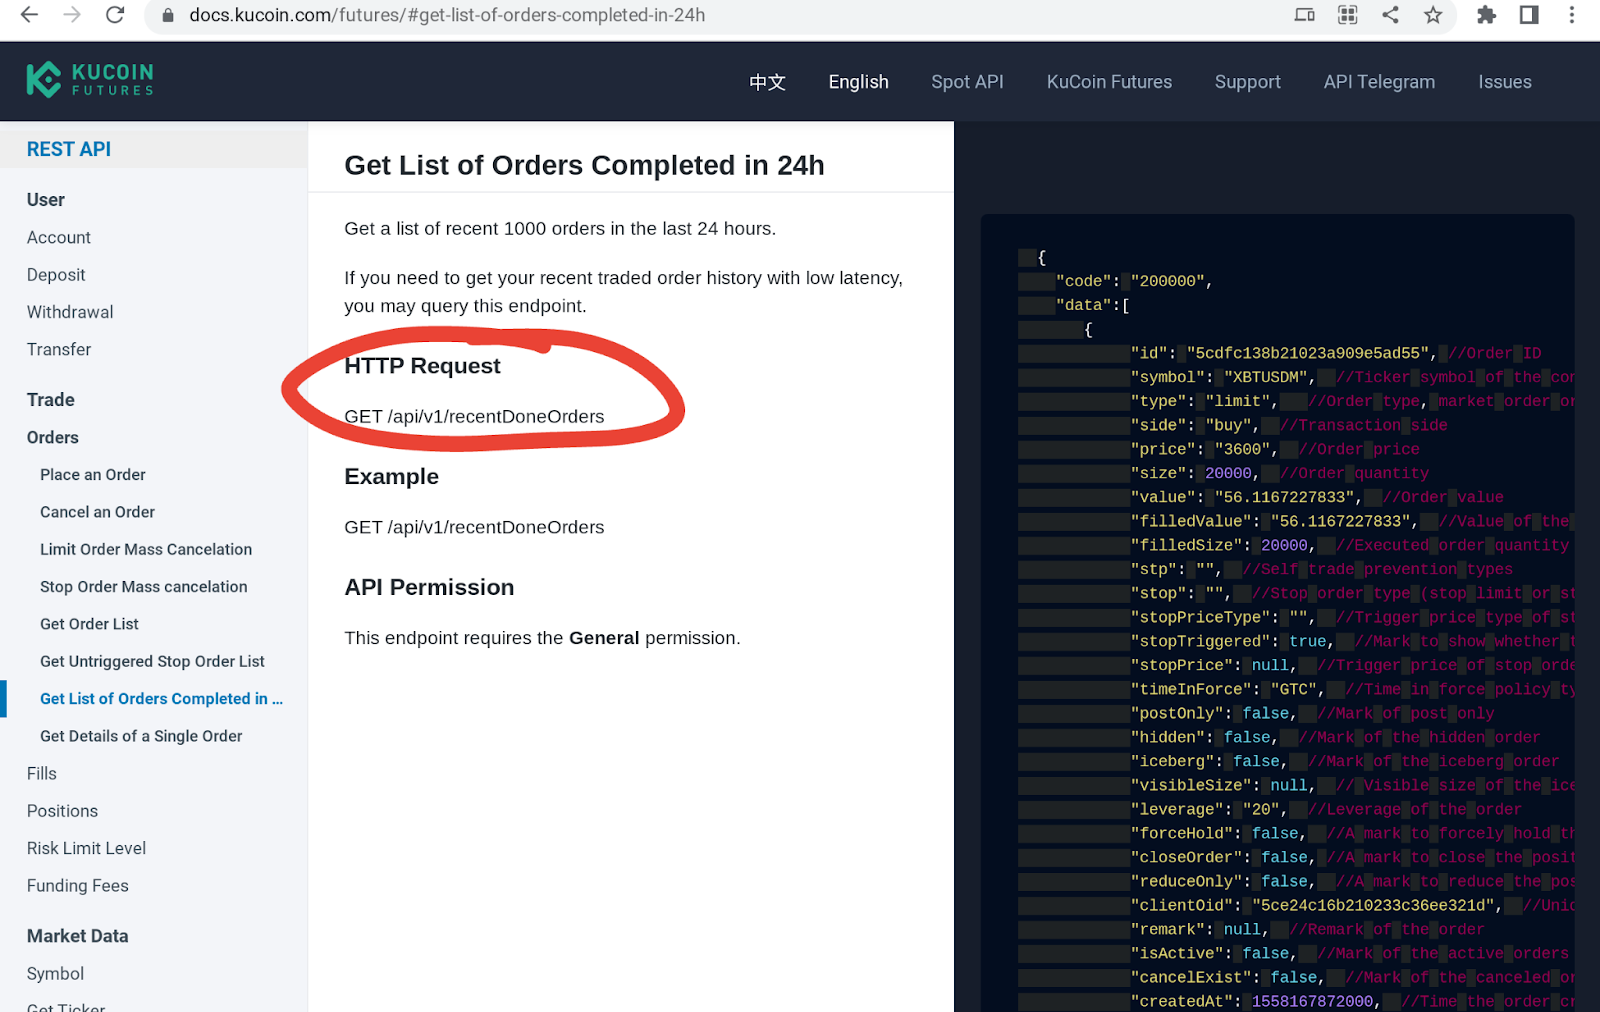
Paste the HTTP Request GET path into the ‘endpoint’ field as shown below, then click the blue Continue button to complete step 3 – Set Up Action.

In step 4 – Authenticate, we will connect to our Kucoin Futures account via the API key. Click the blue ‘Add a new Kucoin Futures API account’ button. A screen will popup for entering Kucoin Futures API credentials into. Leave this screen open so we can fill it in after fetching this data from the Kucoin Futures website.

Go to the Kucoin Futures website and access the ‘Futures API’ settings page.
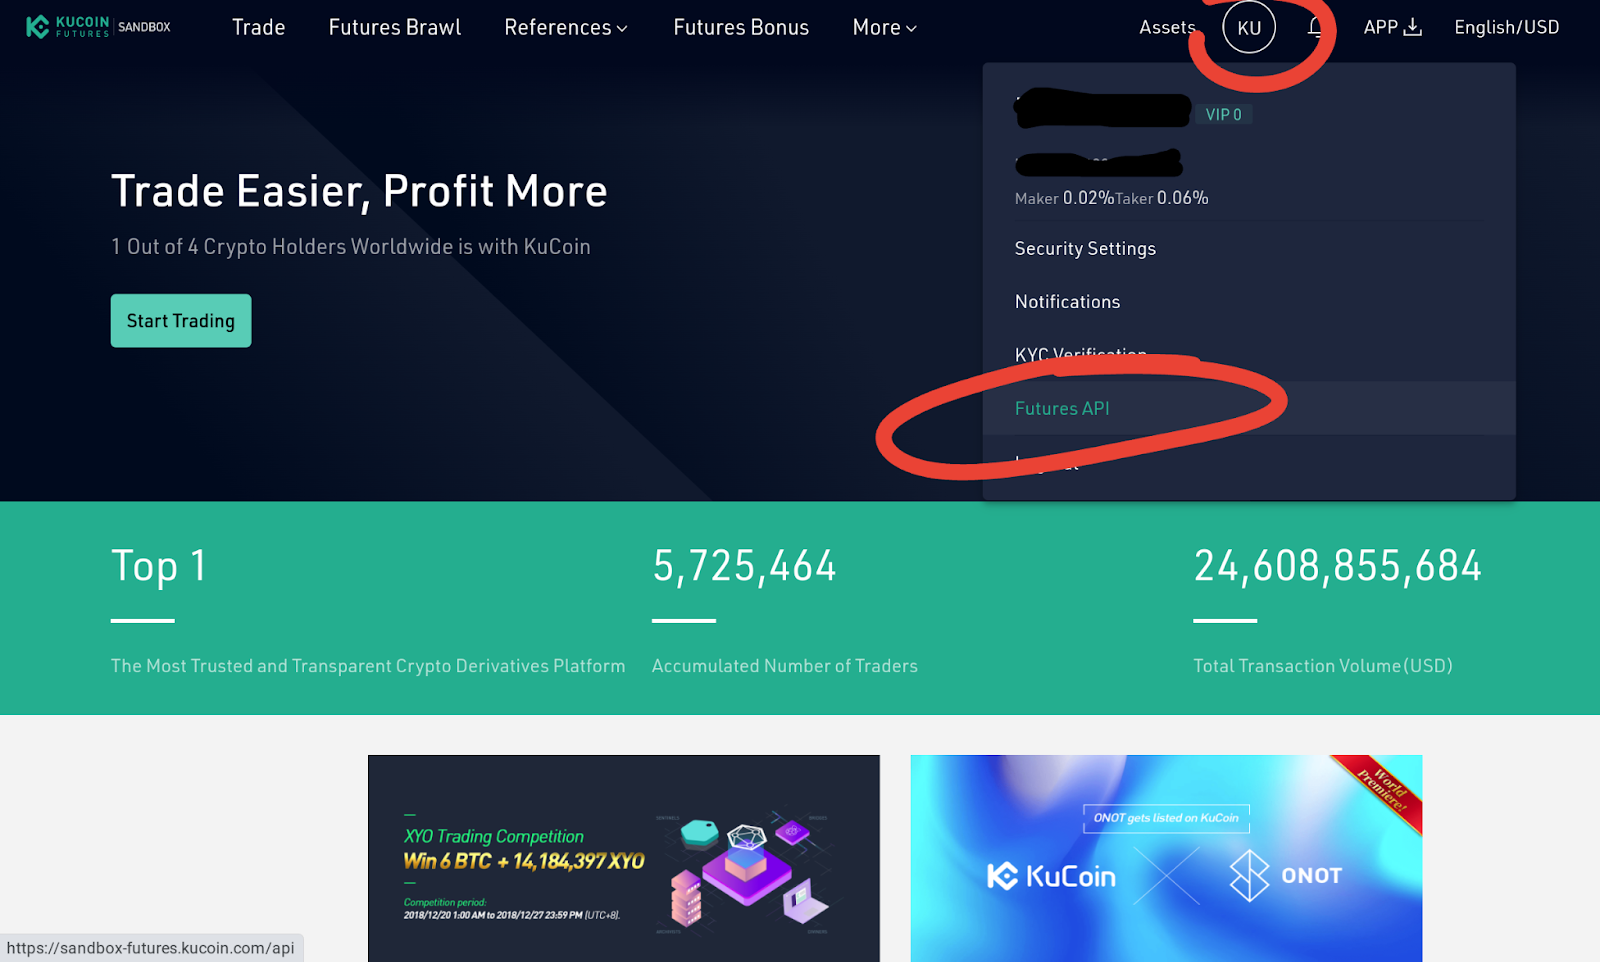
Click the ‘Create’ button.

Setup a name and password for your Kucoin Futures API connection. Be sure to record the password as it will be used in a later step. In the API Restrictions, it’s recommended to only check “General” in the “API Restrictions” section, as this is safest and most likely covers the data requests you’ll be needing. DO NOT CHECK WITHDRAW! You must leave IP Restriction set to No Limit so that the workload cloud based servers can access the API without being blocked.

Now let’s go back to the workload editor’s popup screen for Authenticating your Kucoin Futures Account (screenshot below – this is accessed in Step 4 – Authenticate). Fill in the API Key, Secret, and Passphrase from when you created the API above. You may choose the Production or Sandbox API environment depending on which side you created your API keys on. You can also choose whichever version of the API you want to connect to v1 or v2 here. Click the blue “Yes, Continue” button when complete.

The new Kucoin Futures API connection will now be shown in the Account list, and can be used in other workflows. Click continue to move on to step 5 – Test Action.

Click the blue ‘Test Action’ button to make a test request to the Kucoin Futures API endpoint that you setup in Step 3 – Set Up Action.
If you setup your API settings, credentials, and endpoint correctly, you should now see data in the bottom of the Test Action window. You will also be able to see errors here and troubleshoot. You can come back to this step and test again if you need to solve connectivity problems. Click the blue “Save & Close” button to proceed.

Step 4: Clear data from Google Sheets prior to updating with new Kucoin Futures API data
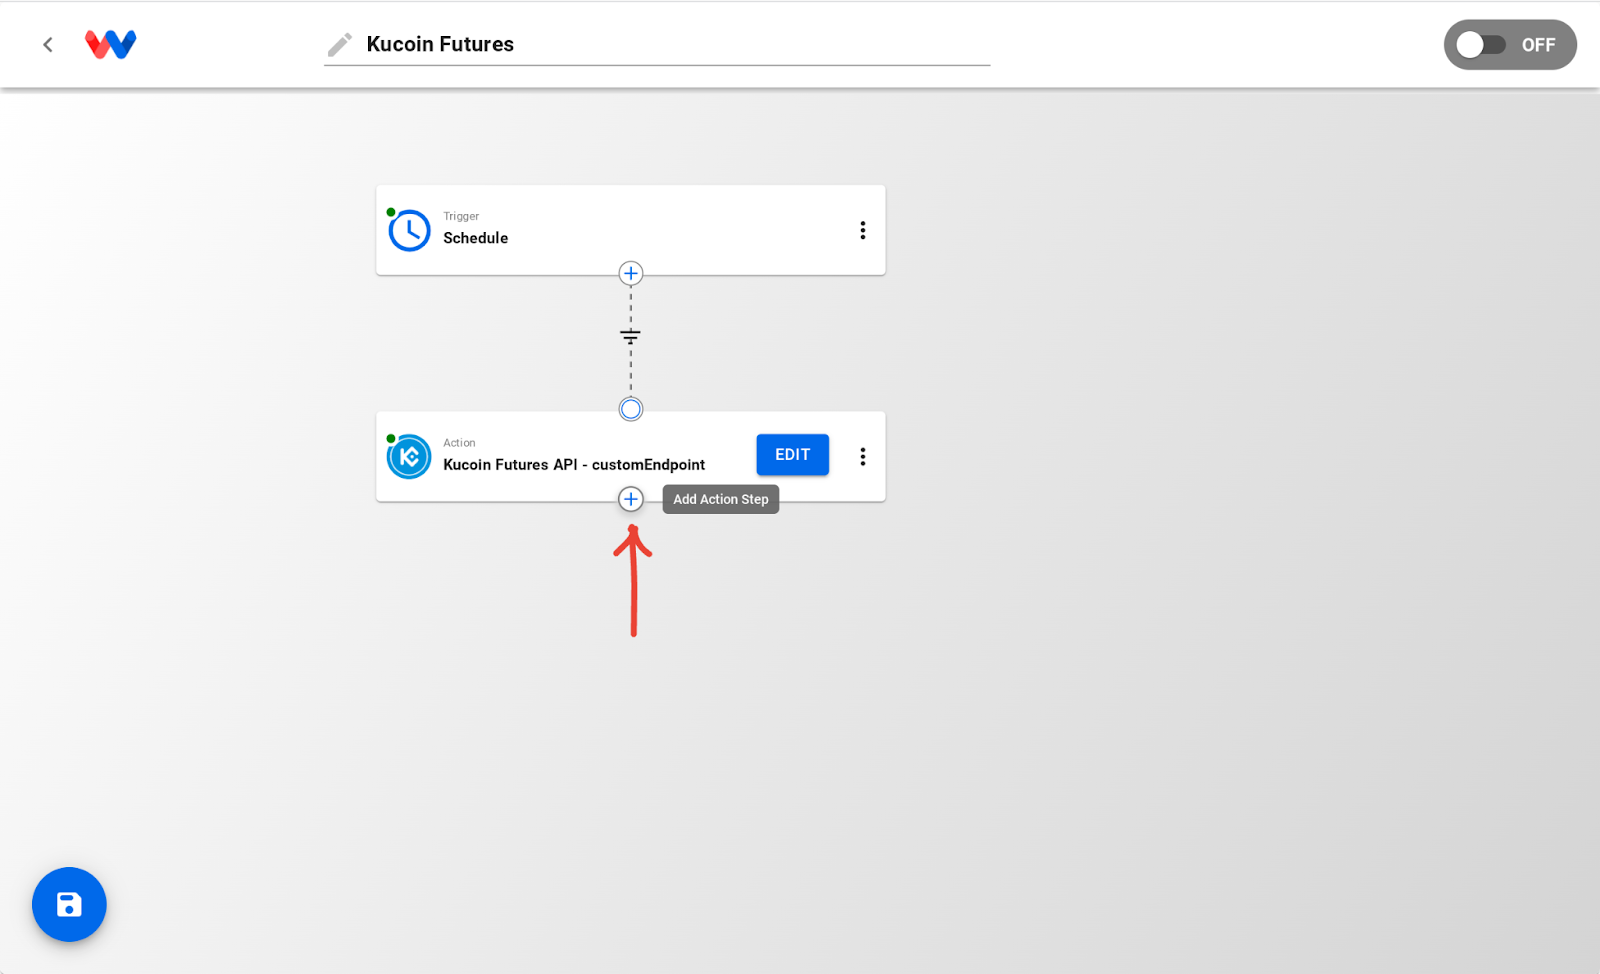
Click the plus sign at the bottom of the Kucoin Futures API node to add a new action node.
Choose Google Sheets app from the App Selector dropdown.

Choose “clear” from the Actions dropdown.

Enter the details about the sheet you want to paste the data into in Step 3 – Set Up Action.

The sheet name is the name of the tab (bottom left).
The spreadsheet ID comes from the URL of your sheet. Copy the blue highlighted identifier in the screenshot below. https://docs.google.com/spreadsheets/d/COPY-THIS-TEXT/edit#gid=123456

Connect Workload to your Google Sheets account by clicking the blue connector button and authenticating the connection.

Click the blue Test Action button in Step 5 – Test Action and you should now see a preview of your data as shown in the screenshot below. You can test that this step is working by entering data onto your sheet and clicking the Test Action button, then you should notice the data being cleared from the sheet. After testing, click the blue “Save & Close” button at bottom to proceed.

Step 5: Setup the Data Looper Action Node to process each row of data in the Kucoin Futures API response
Because we are grabbing multiple rows of data and appending to our google sheet, we need to use a helper tool called a Loop, which iterates each of the objects fetched from the Kucoin Futures API and processes them one by one. Add a new action to your workflow by clicking the plus button at the bottom of the Google Sheets node that you just completed setting up.

Type ‘loop’ and find the ‘Start Loop’ function in the Step 1 – Search for an App dropdown

Choose the startLoop action in the Step 2 – Action – Choose Action step.

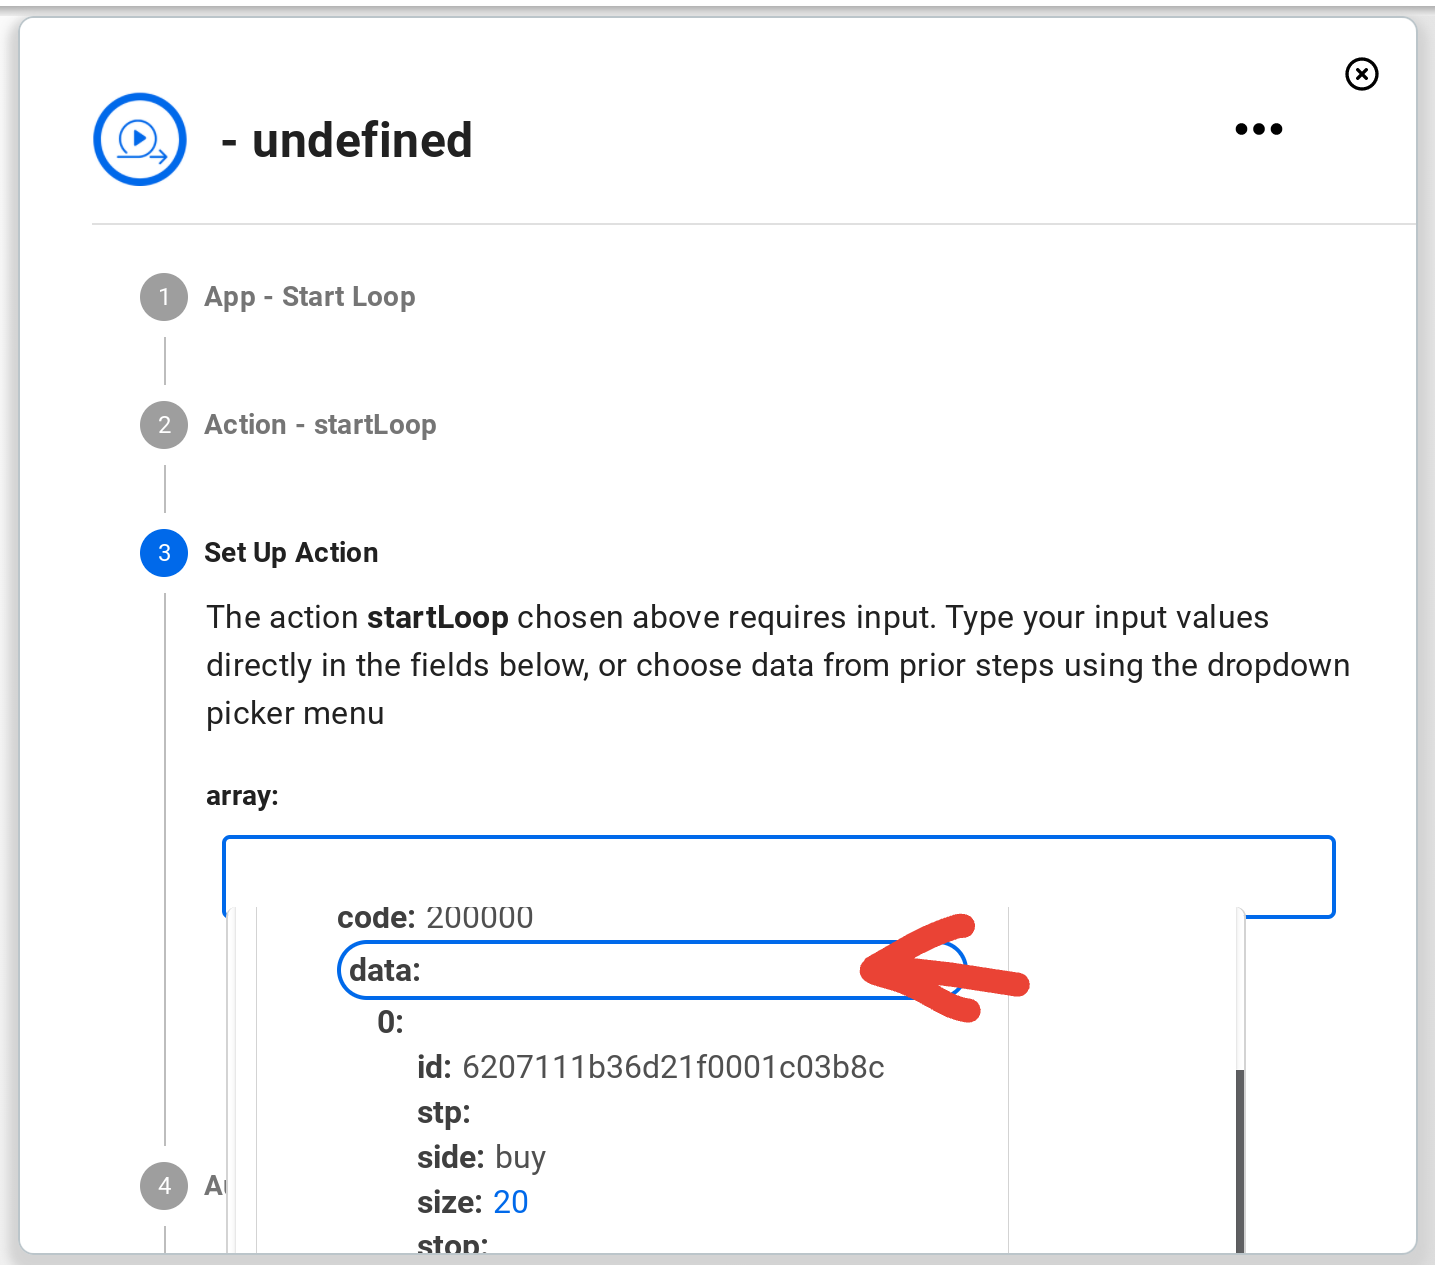
In Step 3 – Set Up Action click the Kucoin Futures API node reference to expand it. Here you’ll see the data that you fetched when testing the Kucoin Futures API step.

Scroll down and select the data node by hovering and clicking it when the “data:” array object in the JSON Schema is highlighted with blue.
Click the blue “Continue” button to proceed. You should see your data show up in the array field. Note if there is a lot of data it may take a while to appear Click continue to proceed.

Click the blue Test button in step 5 – Test Action and you should now see a preview of your data as shown in the screenshot below. This is the data that you’ll be mapping to the Google Sheets rows in the following steps. Click the blue “Save & Close” button at bottom to proceed.

Step 6: Setup the Google Sheets append data step to paste data from the Kucoin Futures API step
Click the plus sign at the bottom of the Loop step to add the final Google Sheets append data node.

Select Google Sheets from the dropdown in Step 1 – Select App.

Choose the append action from the dropdown in Step 2 – Choose Action.

Enter the Spreadsheet ID and range where you want to paste data to in the fields. In the example below we are going to put data in the ‘Orders’ sheet, with headers on the top row, so we start at A2. Our range is a combination of the sheet name and the range, ‘Orders’!A2:Z you can change ‘Orders’ to whatever your column name is to reference a different sheet. Click the “ADD ITEM” button in the bottom right corner to add data fields into the Google Sheets file.

Click the “+ ADD ITEM” button to start mapping fields.

In this example we will be populating three fields. ID, Side, and Size.

Type the column header into the first box. In this example, we are mapping column A in our excel sheet, so we type the header “ID” in the box. Then click the ‘Start Loop’ dropdown in the second box to choose the data.

Pick the data from the list. In this example, we want the ID data to be mapped to the “id” field in the Output, so we click the id field highlighted in the screenshot below.

Use the same process as outlined above to map the Side and Size columns, as shown in the screenshot below.

Click the blue Continue button. On the Authenticate step, you should have a Google Sheets connection already established from when we setup the Google Sheets clear contents step, so choose that existing connection from the list and you won’t have to repeat the Authentication process.

Click the Test Action button to test sending the first row of data.

It may take a few seconds to show up, but you’ll see the response from the action in the bottom section of the window, as shown in the screenshot below. Click Save & Close when you’re done testing.

You should now be able to look at the Google Sheet and see the data populated for the first row of data. (Note, you will only see one row at this stage)

Step 7: Activate the workflow to start fetching data from Kucoin Futures API every minute and sending all rows of data to Google Sheets
Congratulations! You’ve finished setting up your workflow to pull data from Kucoin Futures API and send it into Google Sheets. Now click the save button in the bottom left corner to save your work.
Click the On/Off toggle button in the top right corner to activate the workflow. Your data should now update every minute, fetching new values from Kucioin Futures API and replacing the data in Google Sheets. When the top right slider is green and says ON, your workflow will begin executing every minute.
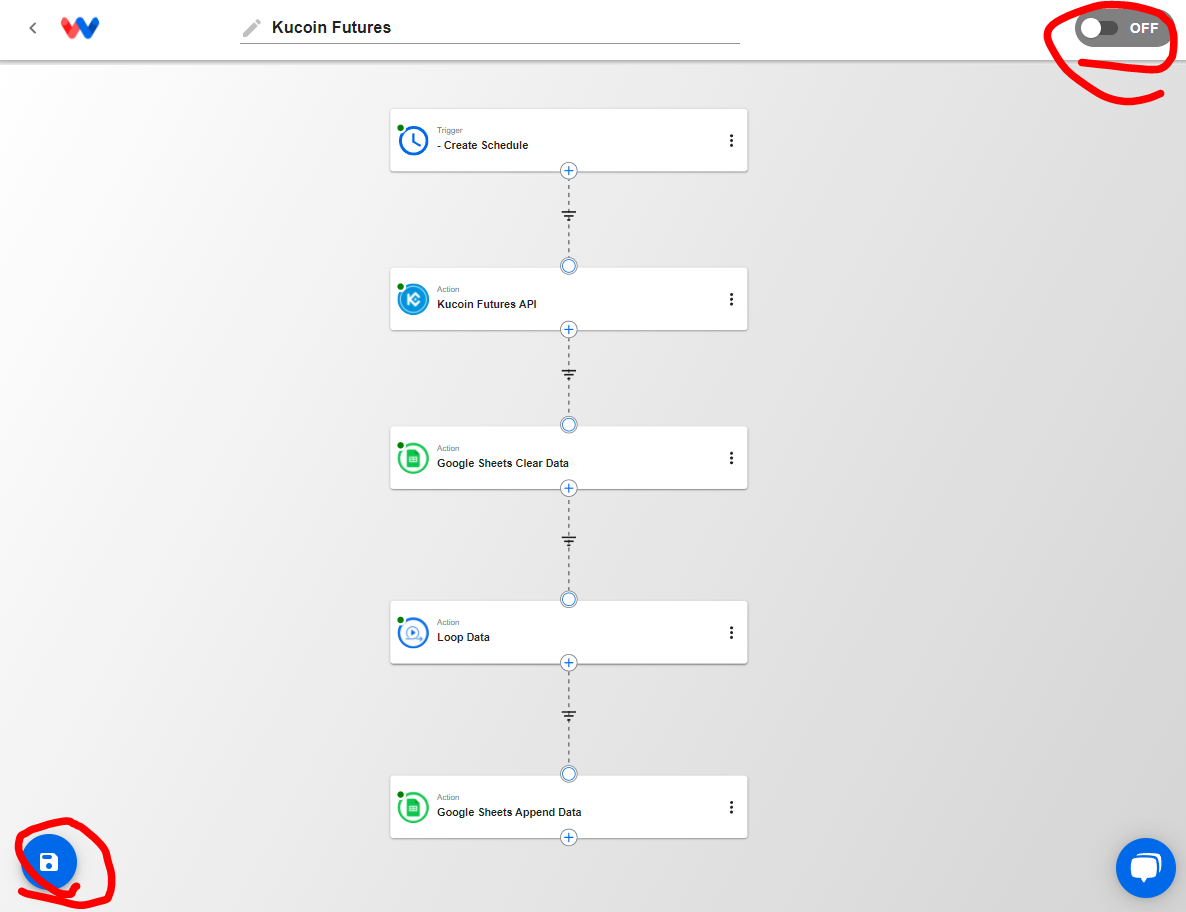
After the first minute cycle, you should be able to see all rows of data populating into Google Sheets.

Your sheet will update on the interval you specified in the Trigger setup as long as it’s turned on. You can turn it off when not in use to save operations.
What is Kucoin Futures?
Kucoin Futures is the easiest, safest, most transparent, and user friendly Bitcoin Litecoin trading platform, offering cryptocurrency perpetual contracts. 100x leverage, no overloads, free bonus, 24/7 online support. Most secure and rapid.
What is Google Sheets?
Google Sheets is an online spreadsheet making tool that helps in creating, editing & sharing spreadsheets in real-time through any PC, mobile or tablet. Create, edit, and share spreadsheets wherever you are with Google Sheets, and get automated insights from your data.
What users say about Workload
Workload has made it easier for me to visualize and bring to life ideas I have for automated workflows with Kucoin Futures. You can jump right in and start integrating almost any software app.
Hire a Zapier expert. Solve your business automation problems, create complex workflows, and help scale your company. Work with a Zapier developer.
Finding a great Zapier developer can entirely transform your business. As a business owner, or a small team, you can enjoy the benefits of automating your workflow without the high costs of a traditional developer. Here the key things you’ll want to understand before you hire a Zapier expert.
What is a Zapier certified expert?
In short, to become a Zapier certified expert, Zapier onboards an independent contractor or an agency through Zapier’s partnership team. From there, the expert is put into the Zapier certified experts program where they’ll be running through different scenarios to prove worthiness of using Zapier’s tool to support their customers.
The certified experts program asks you to imagine a fictitious business scenario, and then you have to perform the automation tasks using Zapier’s tool.
At the end, the expert submits a quick video that discusses their thought process on how/why they chose to use those tools or apps. The team at Zapier reviews your submission and either approves or denies you access to the partner program.
Hire a Zapier Expert
Can the expert help with complex Zapier problems?
Absolutely! These are folks who know the tool inside and out. Many of the Zapier pros have automated tasks that require over 30+ steps in the process! That’s an incredible amount of automation and power in such a cheap SaaS tool. When you are ready to hire a zapier expert, it’s important to know what types of software tools they specialize in. It’s important they know the specific apps in your business’s workflow.
Can an expert make Zapier Zaps?
You bet. While the Zapier course itself only tests the ability to use the SaaS interface that we all know and love, many of the experts are developers and can create a Zapier Zaps integration. That means they can actually take your company’s SaaS tool and bring it online in Zapier’s app list of integrations. You could then connect your SaaS tool to thousands of other apps. This gives your customers the ability to quickly and easily automate their workflows using Zapier’s easy-to-use tool. If you want to hire a Zapier expert to do an integration, they should be well versed a coding language called node.js . That’s what many Zap apps are built with.
Difference between an Expert and a Developer?
A Zapier developer is likely someone who can develop a Zap integration using the command line tool. They’ll connect your SaaS app into one of Zapier’s integrations that can be connected to thousands of other apps.
A Zapier expert is usually someone who is very talented at using Zapier’s front-end UI. They understand the tool inside and out allowing them to whip up complex Zapier workflows. They take less than half the time it would take a normal person.
Can I get help from the Zapier forum or Zapier support?
Of course you can! Using the Zapier forum or contacting Zapier support is a great first step in automating your workflow. If you can quickly get the information you need and do it yourself then why not?
However, sometimes the Zapier forum can take a long time to answer your question, or you may get bad advice. In addition to that, Zapier support can also take a long time to respond. On other occasions, Zapier support will refer you directly to the certified experts directory to work with an outside firm to help you. This is because Zapier’s team is limited in their ability to build solutions directly for customers.
Hire a Zapier Expert to Automate your Businesses Processes and Workflows.
Have you ever been stuck working late putting together reports on a Friday in order to get them out to your boss in time? We’ve all been there. Now with Workload, you can create an automated workflow that searches for the file on your team’s Google Drive on the due date, and emails them to your team!
Getting started with Google Drive
The only prerequisite to creating this workflow is that you’ll need to have access to your team’s Google Drive account, and a file that you’ve been working on. The file can be a Google Doc or a Google Sheet, but for the purpose of this exercise we’ll only be talking about a Google Sheet.
First, if you haven’t already, sign in with your Workload.co account (it’s free to get started). Next, click on “create new” to start building a new automation.

Set up a trigger
All this means is setting up an event that will trigger the workflow. In our example we have a fictitious meeting on Friday at 3pm where our team is reliant on someone emailing out a spreadsheet of data. Instead of relying on someone to do it, let’s rely on a computer instead – computers never get sick or go on vacation!
We need to set up a schedule for this workflow to run every week, on Friday, at 3pm locally. Setting that up with Workload is a breeze.

Select “schedule” from the list of triggers and fill out the form appropriately to specify a weekly cadence on Friday at 3pm.
Click on “CREATE TRIGGER” and look for the confirmation that the schedule was successfully created.
Search for file on Google Drive
Next, you’ll want to drag the right handle of the trigger “node” onto the canvas and drop/release the mouse button. This will add a new step to the flowchart called an “action.” Actions are what happens after the trigger. Click the node and then select Google Drive and click “Next”.
Authenticate your Google Drive account by selecting the appropriate email address associated with the Drive where the file is being stored.
Now you can select the action you want to do with Google Drive, which is going to be ‘search for file’. Type in the name of the file you want to search and email out. In this case we have file called “Skills Temp Table” which has a list of skills to hire temporary workers for.

Click on “Next” and then “Test Action.”
Now your screen will update to show the results (if successful) of the file you searched for. We can see all the info about the file such as it’s Google Drive id, name, owner info, meta data such as links to download the csv or xlsx version, etc.

Send the outbound email
Just like before, drag the handle of the Google Drive node onto the canvas to create a new action.
This time we’ll be using an email app (either Gmail, Outlook, or our internal email utility). For this example, we’ll use the outbound email utility we built internally for its simplicity.
Select “Send Email” as the app and use “Send Outbound Email” as the specified action. Fill out the appropriately being sure to include the To, Subject, Message, and Attachment fields as needed for your example.

Take a special note on how you can reference fields from the Google Drive data step. When you click into a text box in the “Send Email” app, you can select values from prior steps like this:

Test and Send!
Now you’re basically done! Just click next, test the data and check your team’s emails to make sure it sent through. The last important step is to ACTIVATE your workflow by clicking it from OFF to ON using the switch in the upper right.

Stop doing repetitive tasks

About the Clio API
Clio is a practice management platform that helps lawyers work more efficiently by making it easy to do tasks like tracking time, managing matters, and generating invoices. Clio Manage API allows users to access functionality of the system and data stored inside the firm’s Clio instance such as matters, client info, activities, communications, bills, and case files.
Quickstart guide to the Clio API
The easiest and fastest way to start using the Clio API is with a free Workload account. By signing up for Workload, you can have access to the entire Clio API library including all webhooks (triggers) and actions including deletes. Start your free account by signing up here .
Step 1: Sign up and create a new workflow
Once you’ve logged into your free account (3 clicks), click on the “Create New” button in the left sidebar navigation menu:
Step 2: Add the Clio API
Click on the trigger app to open the side bar menu. From the sidebar pane, select “Clio” as the trigger app.

Step 4: Authorize your Clio account
After selecting Clio app and pressing the “Next” button, add the proper authorization. This allows Workload to make API calls on your account’s behalf. This is a necessary step to use the Clio API and to build automated workflows and integrations using Clio.
Click on “Add New”

Step 5: Choose the trigger
A trigger is an action that causes a workflow to execute. It is some kind of change inside of the Clio application. It is the starting point of the task you want to automate.

Step 6: Test the trigger
This is the fun part! After selecting your trigger, go to your Clio app and “do the thing” that would execute a change in your account. If you select “Activity#updated” as your trigger, you should go to Clio and update one of your “Activities”. The changes will now reflect inside of Workload. This data will now become available to use in future steps of your workflow.

Note: The workflow will temporarily turn to “ON” while listening for changes to your Clio account.
Save and close the trigger step by clicking the “Save & Close” button.
Step 7: Add an Action
Add an “Action” to your workflow. Actions occur after the trigger happens. You can add an Action step that will automatically create a Communication in Clio using dynamic data from the original Activity that started the workflow.
Create an action by dragging the “handle” of the trigger onto the empty canvas.

Supported Clio API Triggers
Activity Created
Triggers when a new activity is created in Clio
Matter Created
Triggers when a new activity is created in Clio
Bill Created
Triggers when a new activity is created in Clio
Calendar Entry
Triggers when a new calendar entry is made in Clio
Communication Created
Triggers when a new communication is created in Clio
Contact Created
Triggers when a new contact is created in Clio
Task Created
Triggers when a new task is created in Clio
Activity Updated
Triggers when activities are updated in Clio
Matter Updated
Triggers when activities are updated in Clio
Bill Updated
Triggers when activities are updated in Clio
Calendar Entry Updated
Triggers when calendar entries are updated in Clio
Communication Updated
Triggers when communications are updated in Clio
Contact Updated
Triggers when contacts are updated in Clio
Task Updated
Triggers when tasks are updated in Clio
Supported Clio API Actions
Create an Activity
Creates a new activity in Clio with dynamic data
Update an Activity
Updates an activity in Clio with dynamic data
Search for a Bill
Searches for a specific bill in Clio with dynamic data
Create a Contact
Creates a new Contact in Clio with dynamic data
Update a Contact
Updates a Contact in Clio with dynamic data
Create a Document
Creates a new document in Clio with dynamic data
Search for an Activity
Searches for a specific Activity in Clio
Delete an Activity
Deletes a specific Activity in Clio
Update a Bill
Updates a bill in Clio with dynamic data
Search for a Contact
Searches for a specific Contact in Clio
Delete a Contact
Deletes a specific Activity in Clio
Update a Document
Updates a specific Activity in Clio with dynamic data
What is Clio?
Clio is a cloud-based legal practice management solution suitable for small to large law firms. The platform enables law firms and other businesses in the legal industry to track important deadlines, manage client cases and documents, bill clients, and accept payments.
How many lawyers use Clio?
According to Clio, it is the most widely used legal practice management software in the world with over 150,000 lawyers using it world-wide. This gives Clio a valuation of over $1.6 billion, making it one of Canada’s largest “unicorns”.
How do you use Clio?
Making the decision to invest in your business and purchase law practice management software is a pretty big deal. Actually acting on your decision and following through on the purchase means that you’re now on your way to building a more profitable business. And because you have chosen Clio, you’re also going to get more out of your practice.
With a little planning, you can build a solid foundation to grow your practice. Here, we give you a bit of guidance in setting up some basic Clio functions.
Set up bank accounts
You’ll need to set up two bank accounts in Clio: an operating bank account and an IOLTA/trust bank account.
Account Name: ABC Law Firm Operating Account or ABC Trust Account.
Opening balance:
• For the operating account opening balance, enter
your YTD fee and expense income collected.
• For the trust account opening balance, enter zero
balance.
Once you’ve brought over clients and matters into Clio, you can add the individual amounts you are holding in trust to the appropriate client and matter.
Select Operating account as the default.
1. Defining your Law Firm
During this phase, you’ll want to add users to the Clio account. Be sure to identify if the user is a lawyer or non-lawyer, and set their proper role/permission level. Do not give everyone administrative rights.
Next, you’ll want to configure your settings and payment info. This will show up on your bills that are sent to clients. The more professional you can make your brand settings, the better!
Last in the step is to configure your billing rates. There are 4 levels of billing rates, and you’ll likely want to get started on either a User level billing rate, or an Activity level billing rate. Each firm is different so just be extra careful on this step!
2. Defining your Practice
Set up practice areas
Clio comes with some predefined practice areas. Be sure to review them and add any additional custom areas that are specific to your firm. These can be found under the “Settings” section of the application.
Activity descriptions
In Clio, activity descriptions are used in many areas and are designed to save time and ensure consistency. They can also be used for shortcuts, so learning how to use activity descriptions will help you save even more time.
Activity descriptions are firm-wide settings and are used in these areas:
– Time entries
– Setting up flat-fee matters
There are three types of rates used when defining activity descriptions: User Rates, Flat Fee Rates, and Custom Rates.
Matter numbering
Clio allows for great flexibility when setting up how your matters will be numbered and named; it’s a simple and convenient way for you to identify you matters. Don’t worry, whatever numbering or naming convention you define from day one can be changed later.
Invoice settings
To get started, focus on developing an invoice that’s easy to read and that includes payments and trust account information—pretty simple stuff. The default invoice template that comes with Clio is a great place to start. As you learn more about Clio, you can customize your invoice with some nifty modifications.
3. Invoicing and Payments
Create invoices
The New Bills screen will list all the matters that have unbilled time entries and expenses; these matters are ready to have an invoice created. Choose the matter to bill (you can pick more than one) and click Generate Bills. To the right is an example of what you’ll see for each matter you selected to bill. For your first few bills, keep it simple and use the default Detail Level = All Details. The next screen will be a list of your new bills. From here you can preview each bill by clicking on the ID number. Taking this route also gives you an opportunity to change the bill before printing and sending a final copy.
Receive payments
Now that you’ve set up Clio, it’s time to get paid. There are two places where you can receive payments on invoices.
– At the Invoice view (pg 12) by selecting “Payments”
– Or at the Matter view by selecting “Transactions” and “Add”
– Select “Receive Bill Payment.”
No matter how much of a hurry you’re in, add a description to this payment so that if you need to remember anything about how it was paid, you have the information at your fingertips. For example, list whether it was paid by credit card, check (list check number), or cash.
This method lets you select which open invoice you are applying the payment to.
Can Clio be Automated?
Yes, absolutely! Clio has several integration partners including Workload. To integrate with Workload’s automation software, simply sign up for a FREE account by clicking here.
Once you’ve signed up, you’re almost done. Next you just need to create a new workflow by clicking on the “Create New” button at the top left menu. Add a trigger step by selecting Clio as the trigger app and authenticate your Clio account. Once you’ve done that, the rest is easy.
Workload has over 5,000 possible combinations of workflows you could automate with Clio.
Below is just a small sample of use-cases for automating Clio tasks, including reports!
In this complete guide we’ll demonstrate how easy it is to automatically send data from Salesforce to Snowflake, without coding. Manage your own integration between Salesforce and Snowflake data without the help of a developer.
Step 1: Create an account on Workload
This is as easy it sounds. Just click here to get your platform account up and running! You’ll get access to over 200 enterprise applications that can be used to automate your daily routine tasks using no-code or low-code tools.
Step 2: Select Cron as a trigger step
In order to automatically send data, we want to create a task that triggers every day at a certain time. Ideally you want the data transfer to happen during a time when no one is using Salesforce or updating data. This will reduce the number of data discrepancies. See the image below for a reference.


Step 3: Add the Salesforce Connection
The next step in building your workflow is to add the Salesforce module as an action step and authenticate your credentials so we can begin using the Salesforce API. Additionally, you want to add the actions to the module. Depending on your needs, you’ll want to select data from new opportunities, new contacts, new leads, new cases (support tickets) or a new task. For the purpose of this example, we’ll use “opportunity” as our data selection.
Also we’ll want to select the operation you want to complete. Do you want to create new data into salesforce? Do you want to get data out of Salesforce? Do you want to just get a single record out of Salesforce? This where you can specify that as well. For this example we’ll be “getting” data out of Salesforce to push it into Snowflake in a future step.


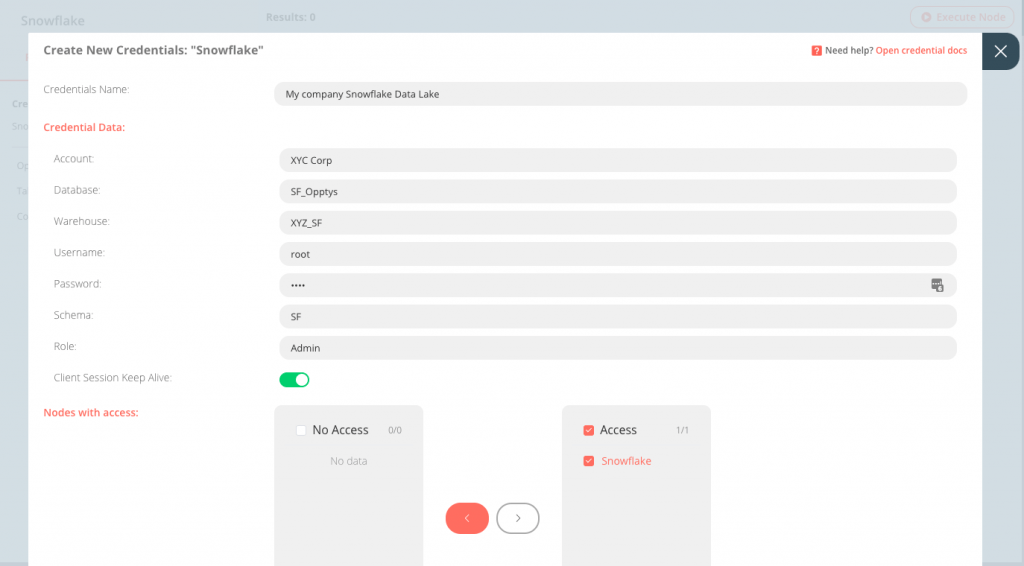
Step 4: Connect Snowflake
Just as you did in step 3 for Salesforce, you’ll do the same for your Snowflake account.
- Select the Snowflake module from the list of apps
- Create a new Snowflake credential to access your data lake.
- For this example, you want to select “Insert” as the operation
- Map your columns from Salesforce to match the correct column name in Snowflake. Ideally they should be the same.

Step 5: Save and Activate Your Workflow
Make sure you save the workflow and give it a name that’s easy to remember later. In the upper right corner of the editor UI, you should also activate your workflow. If you want to quickly test what you’ve built, just change your cron job to run within the next hour. You can also run each module independently and then see what the data looks like for the next step.
Summary
It’s easy to connect and build automated workflows such as connecting and integrating Salesforce with Snowflake. You won’t need to use a developer to get it done, and it can be managed from within your own team’s resources. When you want to add new apps or new data to Snowflake, you can easily make changes and swap in new columns of data without hosting a python script.
If you need help with integrating Salesforce to Snowflake, you can create a support ticket with our implementation experts by clicking the button below.
Get Help With Your Salesforce to Snowflake Integration
Integrate Salesforce with Snowflake in a few clicks with Workload.
Automate your Salesforce tasks. Create your own custom Salesforce and Snowflake integration in minutes.
Make your life easier with your own integration between Salesforce and Snowflake
Using the power of no-code technology, Workload lets you automate workflows between Salesforce and Snowflake.
Plans start at $9/mo and scale with your usage. Receive expert guidance and onboarding to build your perfect workflow. Automate your business.
How to Integrate Salesforce with Snowflake in just a few clicks
- ✅ Authenticate Salesforce and Snowflake
- ✅ Select a trigger that will kickoff the workflow
- ✅ Choose the action you want to complete
- ✅ Map the data fields you want to pass from one app to the other
- ✅ If you get stuck, we’re here to help! Request help in our expert automator service market.
What is Salesforce?
From initial bidding to project management, Sales Cloud empowers construction businesses to easily manage relationships with prospects, clients, suppliers, and partners. Win more bids and minimize change requests with a customizable CRM platform that allows you to reduce busy work, continually optimize project schedule and budget, and make decisions based on real-time data.
What is Snowflake?
Database management tool assists users with data warehousing, data lakes, analytics, collaboration, and more. Designed for businesses of all sizes in media, healthcare, finance, retail, and other industries, it is a database management tool that helps with data engineering, data exchange, and more.
What users say about Workload
We’ve saved hours of time by integrating Salesforce and Snowflake through Workload. We no longer need a developer to generate Python scripts and anyone on our team can now send data into Snowflake as they need, when they need it.
Integrate Salesforce with BigCommerce in a few clicks with Workload.
Automate your Salesforce tasks. Create your own custom Salesforce and BigCommerce integration in minutes.
Make your life easier with your own integration between Salesforce and BigCommerce
Using the power of no-code technology, Workload lets you automate workflows between Salesforce and BigCommerce.
Plans start at $9/mo and scale with your usage. Receive expert guidance and onboarding to build your perfect workflow. Automate your business.
How to Integrate Salesforce with BigCommerce in just a few clicks
- ✅ Authenticate Salesforce and BigCommerce
- ✅ Select a trigger that will kickoff the workflow
- ✅ Choose the action you want to complete
- ✅ Map the data fields you want to pass from one app to the other
- ✅ If you get stuck, we’re here to help! Request help in our expert automator service market.
What is Salesforce?
From initial bidding to project management, Sales Cloud empowers construction businesses to easily manage relationships with prospects, clients, suppliers, and partners. Win more bids and minimize change requests with a customizable CRM platform that allows you to reduce busy work, continually optimize project schedule and budget, and make decisions based on real-time data.
What is BigCommerce?
BigCommerce is the world’s leading cloud ecommerce platform for established and rapidly-growing businesses. Combining enterprise functionality, an open architecture and app ecosystem, and market-leading performance, BigCommerce enables businesses to grow online sales with 80% less cost, time and complexity than on-premise software
What users say about Workload
Sending BigCommerce data to Salesforce helps us increase conversions and also helps our product recommendation engine in other apps like MailChimp. Workload’s tools are very easy to use to build these types of workflows.