
A comprehensive guide to using Skedda to onboard and book spaces for your co-working and event space.
Managing a venue space for co-working, artists, chefs, and other creatives can be challenging. With Skedda, you are now able to manage each event space in an easy-to-use calendar format. You can even book and accept payments directly through Skedda’s integration with Stripe’s payment gateway! This makes running your business a breeze.
In this guide, Workload is going to show how easy it is to get started with Skedda so you can start making money from your event space today.
If you don’t have time to read this article, feel free to watch this short video that outlines this entire blog post.
What is Skedda?
Skedda is a calendar booking system designed specifically for the hourly or daily-use rental of event space. It allows you to manage all of your spaces in an easy to read calendar format. With Skedda, you can accept payments directly through the app with their Stripe account. You’ll need to have a Stripe account to get started. This guide will assume that you already setup with a Stripe basic account, as well as a login to the Skedda platform.
Getting started with Skedda
Aside from already signing up for a Skedda account and the Stripe account integrated from the “integrations” side bar menu item in the Skedda dashboard, you need to create an event space.
From the dashboard page, click the “Spaces” down arrow icon to reveal the “Create another space” option.

Next you’ll be taken to the Settings page where you can click the next button, “Add a space.”

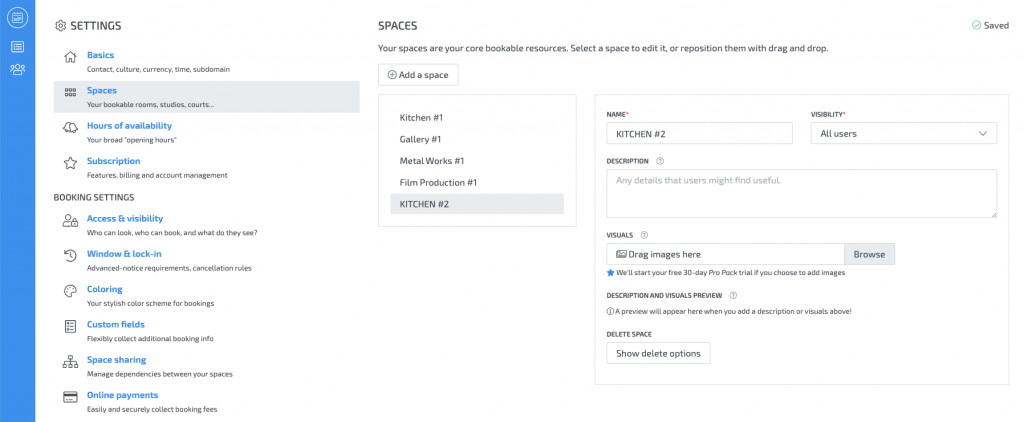
Click the “Add a space” option and fill the title of your space. In this example we’ll use “Kitchen #2”.

Now you’ll be able to see your new space in the settings page and you are ready for the next step
How to set rules for my venue in Skedda
Now that you’ve created your first bookable venue in Skedda, you’ll want to customize the options for the booking experience.
Customizable options allow you to set special rates for a specific event space or gather more information to complete a booking, such as the number of chairs or tables needed for the event (if its a banquet hall, for example).
Click on the gearbox icon (“Settings”) and find the section labeled “Pricing” with the dollar bill icon to get started making cusotmizations to your venue.

This will expose the custom pricing section. From here you will be able to set any pricing rule that you desire.
In this example, we’ll setup a rule that charges $100/hr for all of our venues except Kitchen #2. We’ll have Kitchen #2 set up to be $200/hr
Simply change the dropdowns to reflect the rule exactly how you would want it. In this case we have one rule that says “All times and all spaces are $100/hr for a booking over 30m (our minimum window), except Kitchen #2, which is $200/hr. See the completed formula in the screenshot below.

You can also adjust the minimum booking window, and lock-in period for cancellations in a similar way by clicking on the menu item above the “Pricing” section called “Window and Lock-in”. It works the same way as the Pricing Conditions we just setup in the previous step.
Now you are all set with your first venue, some basic booking rules, and pricing. Next you need to allow customers to be able to book the venue on their own, and add payment information.
How to onboard customers to your Skedda venues
Now that we’re all set with our event space, rules, and pricing, it’s time to get it in front of a customer. In order to that, navigate to the “Users” icon in the parent menu and click on “Send Invite Link” or “Add a User”.

Either way you choose, the end result is the same. You will need to create a “Tag” for these users. In our example, we are tagging the users “Trusted” since they’ll be able to book for themselves.
They’ll receive a link to sign in with their new account once created. The user will be able to see the venues selected in their view, which you can control. They can also start making booking requests and paying upfront for the event space. Here’s a screenshot of the end-user booking experience.

Our end user can click on any time slot that isn’t grayed out to start the booking process.
Once they select their time-slot, a new modal dialog box will appear. The box will ask to confirm their booking, add any notes or fill any special custom fields that are required to complete the booking. The last step is adding a credit card to get paid.
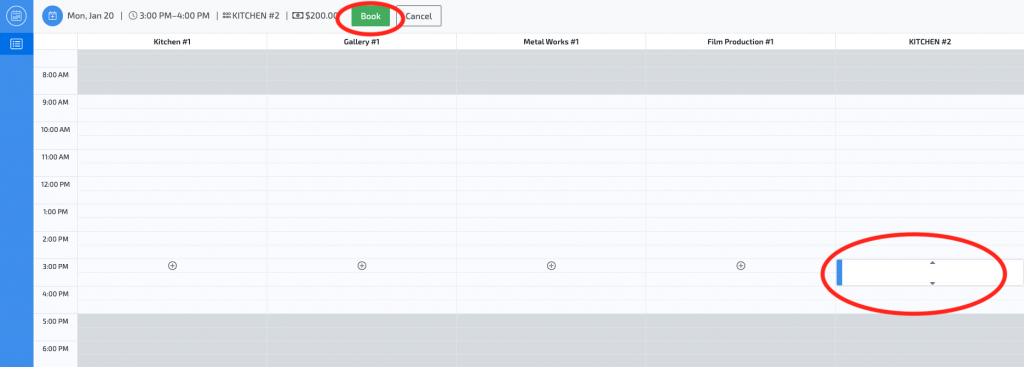
Once the user clicks on “Book”, the modal dialog box appears:

The user is confirmed and an auto-responder email goes out now that all required fields are filled in,
That’s it! You are on your way to created venues and accepting payments for your co-working, creative, or art gallery space in no time at all. Skedda makes it so much easier and handles everything in one piece of software.
Automating your event space with Skedda and Zapier
Finally you’re all set with using Skedda, you can do so much more for your business with tools like Zapier.
To get you started, here are some ideas:
- You can set up a Slack channel to ping your office team when a user confirms a booking
- Add the booking information to a Google Sheet line item
- Create an automated invoice from a new booking with Xero or QuickBooks
- Send SMS alerts to your on-site event planning team to schedule work
If you are interested in automating all or part of your event space, co-working, or other real estate related venue management business, drop us a line below or book a meeting and talk to our Zapier Certified Experts. We are experts at automating almost any software related task for your business. Our pricing is very fair. We work on a small monthly retainer basis, or a per project fee.
[contact-form-7 id=”1266″ title=”Simple Subscribe Form”]