Skip to content
Workload – Automation Software
  • Product
    • Solutions
      • Forms
      • Automate Your AdOps
      • Automate Your HR & Recruiting
    • Integrations
    • Templates
    • Company
      • Blog
      • Integrations
      • Apps
      • Case Studies
      • Experts
      • About
        • Privacy
        • Terms of Service
  • Resources & Support
  • Pricing
  • Login
  • Get Started

What can we help you with?

Getting Started

  • Workload Quickstart Guide
  • Automation 101
  • How to Share Your Workspace
  • What Is Workflow Automation?

Creating Workflows

  • Create workflows (Quick Start Guide)
  • Loop through Workload actions
  • What Is Workflow Automation?
  • Workload Editor Filters: Unlock Smarter Workflow Automation
  • Workflow Building: Adding Steps and Paths to a Workflow
  • Workflow Building: Using Delays in Workflows
  • Identify, Diagnose, Fix: A Guide to Correcting Workflow Errors
  • Workflow Building: Fix Workflow Mistakes with the Undo and Redo Buttons
  • Workflow Building: Reordering Workflow Steps

Managing Workflows

  • Connect an account to Workload
  • How to copy from one workspace to another
  • How to initialize a workflow after copying
  • How to share a workflow as a template with anyone
  • How to Share Your Workspace
  • Workload Editor Filters: Unlock Smarter Workflow Automation
  • Workflow Building: Adding Steps and Paths to a Workflow
  • Workflow Building: Using Delays in Workflows
  • Identify, Diagnose, Fix: A Guide to Correcting Workflow Errors
  • Workflow Building: Fix Workflow Mistakes with the Undo and Redo Buttons
  • Workflow Building: Reordering Workflow Steps

Partner Integrations

  • How do I enable and use the Lever integration?
  • How do I enable and use the Webex integration?
  • How do I enable and use the Zoom integration?
  • How to set up the DrChrono integration with Workload
  • How to find your PEP Cloud (Painter’s Estimating Program) API Key
  • Odoo Contact Creation using Forms by Workload
  • Gmail to Google Sheets Automation
  • Gmail Email to Slack Channel Message
  • Copy Events Between Google Calendars
  • Automate Google Forms and Slack with AI Formatter by Workload
  • Integrate Google Forms and Gmail
  • Automate Emails with Typeform and Gmail
  • Automate Patient Data with DrChrono, Google Sheets, and Gmail
  • Automate New Patient Creation with Jotform and DrChrono
  • Trello Google Calendar Automation: Create Trello Cards from Calendar Events
  • Trello Google Forms Automation: Create Cards from Form Responses
  • Google Sheets Trello Automation: Create Trello Cards from New Spreadsheet Rows
  • Google Sheets Mailchimp Integration: Add Contacts from Spreadsheet Rows
  • DrChrono Google Calendar Integration: Use Webhooks for Automated Appointments
  • Airtable to Mailchimp Integration: Automatically Sync New Contacts
  • Typeform to Airtable Integration: Automated Record Creation
  • Airtable Gmail Integration: New Airtable Records to Sending Emails in Gmail
  • Outlook to Google Calendar Integration: Sync Calendar Events
  • Google Calendar to Outlook Integration: Instant Event Sync
  • Typeform and Outlook Integration: Email New Form Entries
  • Calendly to Google Sheets: Streamline Scheduling with Calendly Invite Logging
  • Calendly to Slack Integration: Instant Slack Alerts from Calendly
  • Google No-Code Workflow: Calendar Event to Sheets Sync
  • Google No-Code Workflow: Sheets to Calendar Sync
  • Google Sheets to Slack Messaging: A No-Code Workflow Tutorial
  • Shopify Orders to Google Sheets Sync: No- Code Workflow
  • Shopify Order to Slack Message | No-Code Automation Tutorial
  • Create Shopify Customers from Jotform Responses | No-Code Workflow
  • Shopify Mailchimp Contact Sync | No-Code Workflow
  • HubSpot to Mailchimp Sync: Hubspot Contacts to Mailchimp Lists | No-Code Workflow
  • HubSpot Form Submissions into Slack Messages | Step-by-Step No-Code Workflow Tutorial
  • Automate HubSpot Form Submissions to Google Sheets | Step-by-Step, No-Code Guide
  • Gmail Alert from Google Sheets | No-Code Automation
  • Google Calendar to Slack Status | No-Code Workflow
  • Mailchimp to HubSpot Subscriber Sync | No-Code Workflow
  • Gmail to Slack Channel Messages | No-Code Workflow Tutorial
  • Create Google Events from Calendly Invitees | No‑Code Workflow Tutorial
  • Gmail Reminder Before Calendar Event | No‑Code Workflow Tutorial
  • Google Calendar Todoist Task Sync | No-Code Workflow Tutorial
  • Google Tasks Todoist Sync | Automatically Create Tasks with No Code
  • Create Todoist Tasks from Starred Gmails | No Code Workflow ⭐ ⇨ ✅
  • Sync Outlook Calendar Events with Todoist Tasks | No-Code Workflow 🗓️⇨ ✅
  • Sync Google Calendar Events with Tasks | No-Code Workflow 🗓️→✅
  • Create Trello Cards from Google Tasks | No-Code Workflow 🧩
  • Create Airtable Records from Google Calendar Events | 📅 → 📁
  • Add Calendly Invitees to Airtable Automatically | No-Code Workflow ⚡
  • Convert Gmail to Tasks Automatically 📥 | No-Code Workflow
  • Send Gmails from Airtable Records Automatically | No-Code Workflow ✉️
  • Log Gmails to Sheets Automatically | No-Code Workflow Tutorial 📬 ⇨ 📊
  • Sync Airtable Records to Sheets | Automate Spreadsheets Without Code 🤖
  • Sync Google Tasks to Sheets Rows | No-Code Automation ✅ ➝ 📊

Utilities

  • Loop through Workload actions
  • Home
  • Docs
  • Partner Integrations
  • Copy Events Between Google Calendars

Copy Events Between Google Calendars

Table of Contents
  • Introduction
  • Overview of Automation
  • Step 1: Create a New Workflow in Workload
    • Log In and Access the Editor
    • Add a Clear Title
  • Step 2: Set Up the Google Calendar Trigger
    • Select Google Calendar as Your Trigger
    • Connect and Test Your Google Calendar Account
  • Step 3: Configure the Google Calendar Action
    • Select Google Calendar as Your Action App
    • Map the Event Details
  • Step 4: Test and Activate the Automation
    • Verify the Setup
    • Activate the Workflow to Automatically Copy Events between Google Calendars
  • Conclusion

Introduction #

Google Calendar is a great tool for managing your schedule. However, manually copying events between multiple calendars takes time. This guide will show you how to copy events between Google Calendars automatically using Workload. With this workflow, your calendars stay in sync, and you save time.

For a video walkthrough, visit our Workload YouTube channel. You can also check out Workload University and our Workload Help page for more tips.


Overview of Automation #

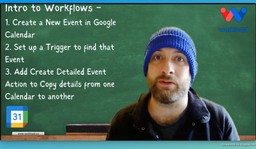
In this workflow, you will learn to:

  • Trigger the process when a new event is created.
  • Copy event details automatically from one calendar to another.
  • Map key event data like title, description, location, and time.
  • Keep your calendars synchronized with ease.

Before you begin, ensure you have:

  • A connected Google Calendar account.
  • A source calendar (for example, your test calendar) and a destination calendar.
  • A Workload account.

Step 1: Create a New Workflow in Workload #

Log In and Access the Editor #

  • First, sign into your Workload account.
  • Then, click the Create Workflow button at the top left.
  • This opens the editor where you will build your automation.
  • Remember to save your work often.

Add a Clear Title #

  • Next, name your workflow clearly.
    For example, use “Copy Calendar”.
  • Save your work frequently so you do not lose any changes.

Step 2: Set Up the Google Calendar Trigger #

Select Google Calendar as Your Trigger #

  • In the editor, choose Google Calendar as your trigger app.
  • Then, select the New Event trigger.
  • This tells Workload to watch your source calendar for new events.

Connect and Test Your Google Calendar Account #

  • Next, click Continue to connect your Google Calendar account securely.
  • Then, select your source calendar.
  • After that, click Test.
    • If you see an event like “Romantic Evening,” your trigger works.
  • Finally, click Continue.

Step 3: Configure the Google Calendar Action #

Select Google Calendar as Your Action App #

  • After setting up the trigger, add an action.
  • Choose Google Calendar as the action app.
  • Then, select the Create Detailed Event action.
  • This step copies the event details to your destination calendar.

Map the Event Details #

  • Next, click Continue and select your Google Calendar account.
  • Then, map the fields from your trigger to your new event:
    • Title: Map to the summary field.
    • Description: Map to the description field.
    • Location: Map to the location field.
    • Start and End Time: Map the time fields.
    • Optionally, choose an event color.
  • After mapping, select your destination calendar.
  • Finally, click Continue and then Test Action to check that the event is copied correctly.

Step 4: Test and Activate the Automation #

Verify the Setup #

  • First, check that both the trigger and action tests are successful.
  • Look for green indicators in the Workload editor. This means everything works as expected.

Activate the Workflow to Automatically Copy Events between Google Calendars #

  • Then, toggle the activation switch to turn on your automation.
  • Every time you create a new event in your source calendar, Workload will copy it to your destination calendar automatically.

Conclusion #

Now you know how to copy events between Google Calendars automatically with Workload. This saves you time, keeps your calendars updated, and makes scheduling easier. You’ll never miss an important event again!

For more tips on automation and scheduling, visit Workload University or check our Workload Help page.

Happy automating!

Google Calendar
Share This Article :
  • Facebook
  • Twitter
  • LinkedIn
  • Pinterest
Still stuck? How can we help?

How can we help?

Updated on June 13, 2025
Gmail Email to Slack Channel MessageAutomate Google Forms and Slack with AI Formatter by Workload

Powered by BetterDocs

Table of Contents
  • Introduction
  • Overview of Automation
  • Step 1: Create a New Workflow in Workload
    • Log In and Access the Editor
    • Add a Clear Title
  • Step 2: Set Up the Google Calendar Trigger
    • Select Google Calendar as Your Trigger
    • Connect and Test Your Google Calendar Account
  • Step 3: Configure the Google Calendar Action
    • Select Google Calendar as Your Action App
    • Map the Event Details
  • Step 4: Test and Activate the Automation
    • Verify the Setup
    • Activate the Workflow to Automatically Copy Events between Google Calendars
  • Conclusion
Workload

Home

Product

Pricing

Templates

Privacy

Terms

About Us

Company

Leadership

Press

Workload Blog

Integrations

Google Sheets Integrations

Gmail Integrations

Amazon Integrations

Asana Integrations

Lever Integrations

Clio Integrations

Slack Integrations

ClickUp Integrations

ServiceTitan Integrations

See All Integrations

Support

Workload 101

Getting Started

Create a Workflow

Create a Trigger

Create an Action

See All Help Docs

© 2025 - workload.co - All rights reserved
This website uses cookies to improve your experience. We'll assume you're ok with this, but you can opt-out if you wish.OKReject Learn About PrivacyOK
Terms, Privacy & More

Privacy Overview

This website uses cookies to improve your experience while you navigate through the website. Out of these, the cookies that are categorized as necessary are stored on your browser as they are essential for the working of basic functionalities of the website. We also use third-party cookies that help us analyze and understand how you use this website. These cookies will be stored in your browser only with your consent. You also have the option to opt-out of these cookies. But opting out of some of these cookies may affect your browsing experience.
Necessary
Always Enabled
Necessary cookies are absolutely essential for the website to function properly. This category only includes cookies that ensures basic functionalities and security features of the website. These cookies do not store any personal information.
Non-necessary
Any cookies that may not be particularly necessary for the website to function and is used specifically to collect user personal data via analytics, ads, other embedded contents are termed as non-necessary cookies. It is mandatory to procure user consent prior to running these cookies on your website.
SAVE & ACCEPT