Skip to content
Workload – Automation Software
  • Product
    • Solutions
      • Forms
      • Automate Your AdOps
      • Automate Your HR & Recruiting
    • Integrations
    • Templates
    • Company
      • Blog
      • Integrations
      • Apps
      • Case Studies
      • Experts
      • About
        • Privacy
        • Terms of Service
  • Resources & Support
  • Pricing
  • Login
  • Get Started

What can we help you with?

Getting Started

  • Workload Quickstart Guide
  • Automation 101
  • How to Share Your Workspace
  • What Is Workflow Automation?

Creating Workflows

  • Create workflows (Quick Start Guide)
  • Loop through Workload actions
  • What Is Workflow Automation?
  • Workload Editor Filters: Unlock Smarter Workflow Automation
  • Workflow Building: Adding Steps and Paths to a Workflow
  • Workflow Building: Using Delays in Workflows
  • Identify, Diagnose, Fix: A Guide to Correcting Workflow Errors
  • Workflow Building: Fix Workflow Mistakes with the Undo and Redo Buttons
  • Workflow Building: Reordering Workflow Steps

Managing Workflows

  • Connect an account to Workload
  • How to copy from one workspace to another
  • How to initialize a workflow after copying
  • How to share a workflow as a template with anyone
  • How to Share Your Workspace
  • Workload Editor Filters: Unlock Smarter Workflow Automation
  • Workflow Building: Adding Steps and Paths to a Workflow
  • Workflow Building: Using Delays in Workflows
  • Identify, Diagnose, Fix: A Guide to Correcting Workflow Errors
  • Workflow Building: Fix Workflow Mistakes with the Undo and Redo Buttons
  • Workflow Building: Reordering Workflow Steps

Partner Integrations

  • How do I enable and use the Lever integration?
  • How do I enable and use the Webex integration?
  • How do I enable and use the Zoom integration?
  • How to set up the DrChrono integration with Workload
  • How to find your PEP Cloud (Painter’s Estimating Program) API Key
  • Odoo Contact Creation using Forms by Workload
  • Gmail to Google Sheets Automation
  • Gmail Email to Slack Channel Message
  • Copy Events Between Google Calendars
  • Automate Google Forms and Slack with AI Formatter by Workload
  • Integrate Google Forms and Gmail
  • Automate Emails with Typeform and Gmail
  • Automate Patient Data with DrChrono, Google Sheets, and Gmail
  • Automate New Patient Creation with Jotform and DrChrono
  • Trello Google Calendar Automation: Create Trello Cards from Calendar Events
  • Trello Google Forms Automation: Create Cards from Form Responses
  • Google Sheets Trello Automation: Create Trello Cards from New Spreadsheet Rows
  • Google Sheets Mailchimp Integration: Add Contacts from Spreadsheet Rows
  • DrChrono Google Calendar Integration: Use Webhooks for Automated Appointments
  • Airtable to Mailchimp Integration: Automatically Sync New Contacts
  • Typeform to Airtable Integration: Automated Record Creation
  • Airtable Gmail Integration: New Airtable Records to Sending Emails in Gmail
  • Outlook to Google Calendar Integration: Sync Calendar Events
  • Google Calendar to Outlook Integration: Instant Event Sync
  • Typeform and Outlook Integration: Email New Form Entries
  • Calendly to Google Sheets: Streamline Scheduling with Calendly Invite Logging
  • Calendly to Slack Integration: Instant Slack Alerts from Calendly
  • Google No-Code Workflow: Calendar Event to Sheets Sync
  • Google No-Code Workflow: Sheets to Calendar Sync
  • Google Sheets to Slack Messaging: A No-Code Workflow Tutorial
  • Shopify Orders to Google Sheets Sync: No- Code Workflow
  • Shopify Order to Slack Message | No-Code Automation Tutorial
  • Create Shopify Customers from Jotform Responses | No-Code Workflow
  • Shopify Mailchimp Contact Sync | No-Code Workflow
  • HubSpot to Mailchimp Sync: Hubspot Contacts to Mailchimp Lists | No-Code Workflow
  • HubSpot Form Submissions into Slack Messages | Step-by-Step No-Code Workflow Tutorial
  • Automate HubSpot Form Submissions to Google Sheets | Step-by-Step, No-Code Guide
  • Gmail Alert from Google Sheets | No-Code Automation
  • Google Calendar to Slack Status | No-Code Workflow
  • Mailchimp to HubSpot Subscriber Sync | No-Code Workflow
  • Gmail to Slack Channel Messages | No-Code Workflow Tutorial
  • Create Google Events from Calendly Invitees | No‑Code Workflow Tutorial
  • Gmail Reminder Before Calendar Event | No‑Code Workflow Tutorial
  • Google Calendar Todoist Task Sync | No-Code Workflow Tutorial
  • Google Tasks Todoist Sync | Automatically Create Tasks with No Code
  • Create Todoist Tasks from Starred Gmails | No Code Workflow ⭐ ⇨ ✅
  • Sync Outlook Calendar Events with Todoist Tasks | No-Code Workflow 🗓️⇨ ✅
  • Sync Google Calendar Events with Tasks | No-Code Workflow 🗓️→✅
  • Create Trello Cards from Google Tasks | No-Code Workflow 🧩
  • Create Airtable Records from Google Calendar Events | 📅 → 📁
  • Add Calendly Invitees to Airtable Automatically | No-Code Workflow ⚡
  • Convert Gmail to Tasks Automatically 📥 | No-Code Workflow
  • Send Gmails from Airtable Records Automatically | No-Code Workflow ✉️
  • Log Gmails to Sheets Automatically | No-Code Workflow Tutorial 📬 ⇨ 📊
  • Sync Airtable Records to Sheets | Automate Spreadsheets Without Code 🤖
  • Sync Google Tasks to Sheets Rows | No-Code Automation ✅ ➝ 📊

Utilities

  • Loop through Workload actions
  • Home
  • Docs
  • Managing Workflows
  • How to initialize a workflow after copying

How to initialize a workflow after copying

Table of Contents
  • Next: click on the Choose Account step and then click the blue button to "Sign into ServiceTitan"
  • Next: Click Continue
  • Next: Click on "Test Trigger"
  • Next: Review data and press "Continue" if everything looks correct.
  • Open a workflow where PEP is the trigger:
  • With webhook triggers, you'll have to do something a little different than above.
  • First, click "Choose event" and then clear out the event by clicking the "x" to the right of the event dropdown field:
  • Next: Click the same dropdown and select the same event for "eBid Created" and then click "Next: Choose account"
  • Next: Select your proper account and then click "Continue". If there is not account then create a new connection by clicking the blue "Sign into PEP" button and adding the api key.

In this help article, you’ll learn how to properly initialize a workflow after using the “Copy To” workspace feature. When you copy or duplicate a workflow, some of the artifacts that make it run are missing – most notably, the trigger and account connection.

In order for a workflow to function properly, it needs to have a trigger created. A trigger is something that kicks off the workflow. It is an event such as a new customer, a new job, a new invoice, updated spreadsheet rows or a certain time of day. This is just an example of many different kinds of triggers. Each application will have its own set of triggers that can kick off a workflow.

Upon first look, it would appear there is already a trigger in your copied workflow. However, on Workload’s backend, it has not been initialized. In order to initialize it, click into the Trigger step and open it.

It is important to note that there are two types of triggers – polling and webhooks. In this first example, we will look at a polling trigger for ServiceTitan.

ServiceTitan uses polling style triggers

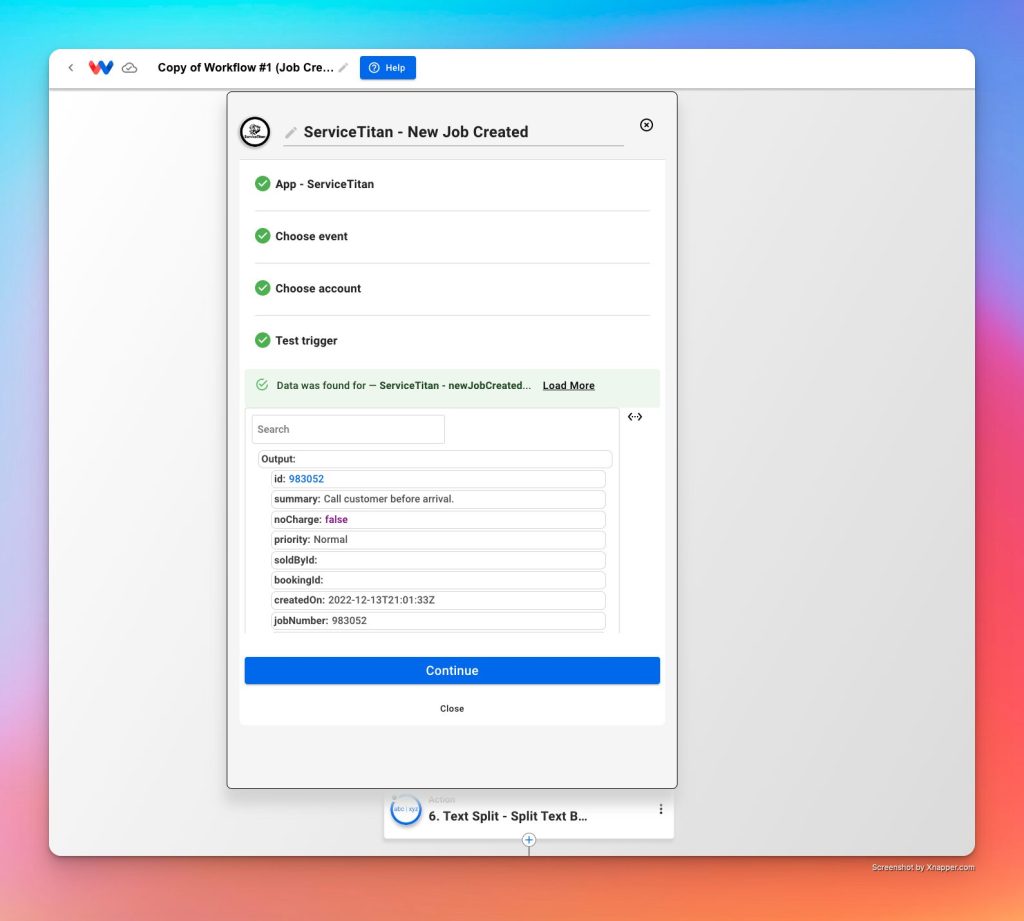
Next: click on the Choose Account step and then click the blue button to “Sign into ServiceTitan” #

Fill in the form fields accordingly, make sure to include all necessary fields before click “Yes, Continue” at the bottom of the popup window.

Next: Click Continue #

Next: Click on “Test Trigger” #

Next: Review data and press “Continue” if everything looks correct. #

After pressing Continue, you’ll be taken to the next subsequent step in the workflow, which happens to be another ServiceTitan app in this example. Click on the “Account” step here and manually select the first account in the dropdown list.

Repeat the same thing for each of the steps that include a 3rd party software function (not Workload’s own formatting functions). Open the step by clicking inside the box or the blue “EDIT” button, then go to “Account” and manually select the account.

You may need to connect new credentials by signing into the other apps that aren’t ServiceTitan (for this example).

Now let’s look at a Webhook style trigger. In this example we’ll use the Painter’s Estimating Program (PEP) to work from.

Open a workflow where PEP is the trigger: #

With webhook triggers, you’ll have to do something a little different than above. #

First, click “Choose event” and then clear out the event by clicking the “x” to the right of the event dropdown field: #

Next: Click the same dropdown and select the same event for “eBid Created” and then click “Next: Choose account” #

Next: Select your proper account and then click “Continue”. If there is not account then create a new connection by clicking the blue “Sign into PEP” button and adding the api key.
#

Now your screen should look like this:

If you have the ability to immediately capture a “live” event, then click the blue button for “Test Trigger” a timer will appear and you’ll have 60 seconds to perform the event that would fire off the webhook for eBid Created.

In this example, we don’t have the ability to wait for an event for fire and time it correctly, so we will click on “Customize Trigger Data” instead. A popout window will appear where you can paste JSON data directly into the box, which can be treated as the sample trigger data.

We can use this JSON as our sample data:

{
  "JobInfo": {
    "Fax": "",
    "Cell": "",
    "City": "Franklin",
    "Email": "test4@workload.co",
    "JobId": "679318",
    "JobNo": "",
    "Notes": "",
    "Phone": "3177368217",
    "State": "IN",
    "Status": "New",
    "SyncId": "",
    "Country": "United States",
    "InitRqd": "",
    "JobName": "3116733 - Residential Interior",
    "JobType": "Residential Interior",
    "Zipcode": "46131",
    "Address1": "543 Home Street",
    "Address2": "",
    "ClientId": "521297",
    "JobDescr": "Call customer before arrival.",
    "ClientUUID": "",
    "CreateDate": "2022-11-04T18:21:20.38Z",
    "FinishDate": "",
    "HourlyRate": "",
    "DiscountMat": "0",
    "DscntLbrPct": "",
    "DscntMatPct": "",
    "ExtAppJobId": "",
    "HoursAccess": "8",
    "JobAreaList": [
      {
        "M4": "",
        "IsOpt": "false",
        "AreaName": "Project",
        "IsAChOrd": "false",
        "UseTempl": "",
        "JobAreaId": "3012382",
        "AreaPicURL": "",
        "AreaCalcType": ""
      }
    ],
    "LocalStatus": "",
    "ContractDate": "",
    "ProposalDate": "",
    "TaxRateLabor": "0",
    "UpgLvlSelect": "",
    "AbstractJobId": "c13c7400-ee9b-4a2b-a099-b4550591c968",
    "DiscountLabor": "0",
    "HoursBillable": "8",
    "WorkStartDate": "",
    "CrewAssignment": "_UNASSIGNED",
    "ExtraMaterials": "0",
    "OverheadMarkup": "0",
    "SyncDeletedUtc": "",
    "UseDscntLbrPct": "",
    "UseDscntMatPct": "",
    "ExtAppCompanyId": "",
    "RoundUpMaterial": "false",
    "AbstractClientId": "",
    "NewJobHourlyRate": "",
    "TaxRateMaterials": "0",
    "WorkStartDateStr": "",
    "ProfitMarkupLabor": "0",
    "UserNameOfCreator": "",
    "ChangeJobHourlyRate": "",
    "ChargeForLeftOverMat": "false",
    "DefaultNumberOfSteps": "",
    "ProfitMarkupMaterials": "0.2",
    "SyncSrvLastUpdatedUtc": "2022-11-09T19:07:33.44Z",
    "ExtraMaterialsIsMarkup": "",
    "TaxRateMaterialsToCust": "0"
  },
  "ClientInfo": {
    "Fax": "",
    "Cell": "",
    "City": "Franklin",
    "Email": "test4@workload.co",
    "Notes": "created by workload.co",
    "Phone": "3174568832",
    "State": "IN",
    "SyncId": "",
    "Country": "United States",
    "IsALead": "false",
    "JobList": "",
    "Zipcode": "46131",
    "Address1": "543 Main Street",
    "Address2": "",
    "ClientId": "521297",
    "GoogleId": "",
    "LastName": "Deisel",
    "CompanyId": "15419",
    "FirstName": "Bobby",
    "SMSOptOut": "",
    "CreateDate": "2022-08-31T19:25:12.34Z",
    "CrtsyTitle": "",
    "GoogleETag": "",
    "LeadSource": "",
    "CompanyName": "BD Inc.",
    "EmailOptOut": "",
    "GQProfileId": "",
    "LastUpdated": "2022-09-01T20:11:44.533Z",
    "QBExprtDate": "",
    "ColorDotColor": "orange",
    "CompanyUserId": "",
    "GoogleUpdated": "",
    "ExtAppClientId": "",
    "LeadSourceType": "",
    "SyncDeletedUtc": "",
    "EmailOptOutDate": "",
    "ExtAppCompanyId": "",
    "AbstractClientId": "339bfb79-7c4c-4a59-94c9-58e93ece12c4",
    "DoNotSndToRfrlia": "",
    "SMSOptOutDateUtc": "",
    "SyncSrvLastUpdatedUtc": "2022-09-01T20:11:44.533Z"
  },
  "ReasonLost": "",
  "JobCostInfo": {
    "JobId": "679318",
    "Labor": {
      "wcTaxLabor": "0",
      "wcLaborTotal": "1344.08",
      "wcLaborProfit": "0",
      "overheadMarkup": "0",
      "wcLaborWithTax": "1344.08",
      "wcDiscountLabor": "0",
      "wcLaborOverhead": "0",
      "profitMarkupLabor": "0",
      "wcLaborAfterDiscount": "1344.08",
      "wcLaborWithoutProfit": "1344.08",
      "wcTotalLaborOverride": "0",
      "wcTotalLaborFixedRateItems": "0",
      "wcLaborWithoutProfitOrOverhead": "1344.08",
      "laborProfitPercentAfterDiscount": "0"
    },
    "JobType": "Residential Interior",
    "Material": {
      "wcDiscountMat": "0",
      "wcMaterialTax": "0",
      "wcMaterialWithTax": "0",
      "wcMaterialsProfit": "0",
      "wcMatAfterDiscount": "0",
      "wcTotalMaterialPrice": "0",
      "profitMarkupMaterials": "0.2",
      "wcTotalMaterialOverride": "0",
      "wcMaterialsWithoutProfit": "0",
      "wcTotalMaterialFixedPrice": "0",
      "materialProfitPercentAfterDiscount": "0"
    },
    "DspMatTax": "$0.00",
    "GrandTotal": "1344.08",
    "DiscountMat": "0",
    "DscntLbrPct": "",
    "DscntMatPct": "",
    "DspLaborTax": "$0.00",
    "MatSubtotal": "0",
    "DspMatProfit": "$0.00",
    "TaxRateLabor": "0",
    "DiscountLabor": "0",
    "DspGrandTotal": "$1,344.08",
    "LaborSubtotal": "1344.08",
    "DspLaborProfit": "$0.00",
    "DspMatDiscount": "$0.00",
    "DspMatSubtotal": "$0.00",
    "OverheadMarkup": "0",
    "UseDscntLbrPct": "",
    "UseDscntMatPct": "",
    "DspLaborDiscount": "$0.00",
    "DspLaborOverhead": "$0.00",
    "DspLaborSubtotal": "$1,344.08",
    "DspTotalRawLabor": "$1,344.08",
    "RemainingBalance": "1344.08",
    "TaxRateMaterials": "0",
    "ProfitMarkupLabor": "0",
    "DspTotalLaborHours": "9h 4m",
    "DspRemainingBalance": "$1,344.08",
    "DspTotalGrossProfit": "$0.00",
    "DspTotalRawMaterial": "$0.00",
    "DspEffLaborHourlyRate": "$148.19",
    "ProfitMarkupMaterials": "0.2",
    "DspTotalGrossProfitPct": "0.0",
    "TaxRateMaterialsToCust": "0",
    "DspMatProfitPctAftDscnt": "0.0",
    "DspLaborProfitPctAftDscnt": "0.0",
    "DspCombinedLaborAndMatProfit": "$0.00",
    "DspCombinedLaborAndMatDiscount": "$0.00"
  },
  "ExtAppCompanyId": ""
}

Copy the above block of code and paste it directly into the Custom Trigger popout box in Workload, then click “Submit”:

After hitting “submit” in the code box

Next: Click “Continue” and then click “Save & Close” on the next subsequent step. You should now be back into the editor’s view that shows all the steps in a flowchart. Click into any other 3rd party software apps like ServiceTitan, Google Sheets, etc. and make sure to manually add the “Connect Account” step to each of them.

how-to
Share This Article :
  • Facebook
  • Twitter
  • LinkedIn
  • Pinterest
Still stuck? How can we help?

How can we help?

Updated on January 11, 2023
How to copy from one workspace to anotherHow to share a workflow as a template with anyone

Powered by BetterDocs

Table of Contents
  • Next: click on the Choose Account step and then click the blue button to "Sign into ServiceTitan"
  • Next: Click Continue
  • Next: Click on "Test Trigger"
  • Next: Review data and press "Continue" if everything looks correct.
  • Open a workflow where PEP is the trigger:
  • With webhook triggers, you'll have to do something a little different than above.
  • First, click "Choose event" and then clear out the event by clicking the "x" to the right of the event dropdown field:
  • Next: Click the same dropdown and select the same event for "eBid Created" and then click "Next: Choose account"
  • Next: Select your proper account and then click "Continue". If there is not account then create a new connection by clicking the blue "Sign into PEP" button and adding the api key.
Workload

Home

Product

Pricing

Templates

Privacy

Terms

About Us

Company

Leadership

Press

Workload Blog

Integrations

Google Sheets Integrations

Gmail Integrations

Amazon Integrations

Asana Integrations

Lever Integrations

Clio Integrations

Slack Integrations

ClickUp Integrations

ServiceTitan Integrations

See All Integrations

Support

Workload 101

Getting Started

Create a Workflow

Create a Trigger

Create an Action

See All Help Docs

© 2025 - workload.co - All rights reserved
This website uses cookies to improve your experience. We'll assume you're ok with this, but you can opt-out if you wish.OKReject Learn About PrivacyOK
Terms, Privacy & More

Privacy Overview

This website uses cookies to improve your experience while you navigate through the website. Out of these, the cookies that are categorized as necessary are stored on your browser as they are essential for the working of basic functionalities of the website. We also use third-party cookies that help us analyze and understand how you use this website. These cookies will be stored in your browser only with your consent. You also have the option to opt-out of these cookies. But opting out of some of these cookies may affect your browsing experience.
Necessary
Always Enabled
Necessary cookies are absolutely essential for the website to function properly. This category only includes cookies that ensures basic functionalities and security features of the website. These cookies do not store any personal information.
Non-necessary
Any cookies that may not be particularly necessary for the website to function and is used specifically to collect user personal data via analytics, ads, other embedded contents are termed as non-necessary cookies. It is mandatory to procure user consent prior to running these cookies on your website.
SAVE & ACCEPT