Send Personalized HubSpot Emails with AI Wizard 💌
Adam Browder
October 23, 2025
When a new contact enters your CRM, the first message you send sets the tone for the relationship. For busy sales and marketing teams, it’s easy to miss that crucial moment to connect. Automating your follow-ups ensures every lead gets the attention they deserve. That’s where learning how to send personalized HubSpot emails with Workload becomes a real advantage.
This automation instantly drafts and delivers a customized Gmail message the moment a new HubSpot contact is created. Using AI Wizard by Workload, it tailors each email with the contact’s name and context—so every outreach feels thoughtful, not templated.
By eliminating manual typing and switching between apps, you free your team to focus on meaningful conversations instead of repetitive tasks. The result is faster responses, higher engagement, and a more consistent customer experience from day one.
🔌 Essentials
📊 HubSpot
Your CRM to track new contacts and manage customer details.
✉️ Gmail
Send personalized welcome and follow-up emails automatically.
🤖 Workload (free or paid)
Build, run, and manage your automation—no code needed.
💡 Why Automate
⚡ Instant Outreach
Email new HubSpot contacts the moment they’re added.
🧠 Personalize Every Message
Use AI Wizard to write natural, context-aware emails.
📬 Automatic Delivery
Send messages instantly through Gmail—no typing required.
💬 Boost Engagement
Quick follow-ups make new contacts more likely to respond.
⚙️ Build a Send Personalized HubSpot Emails Automation
Apps expect data in different formats—like dates, names, or labels. Workload’s built-in AI Wizard lets you clean or adjust data between steps. If your trigger already sends clean data, you can skip formatting altogether.
Step 1: Create a New Automation (Workload)
Click Create Workflow in your Workload dashboard.

Give your automation a title — for example: Send Personalized HubSpot Emails.

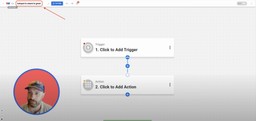
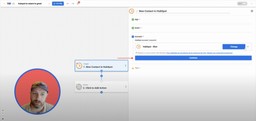
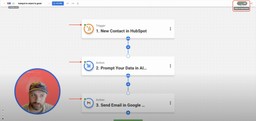
Step 2: Set Up the Trigger (HubSpot)
Click inside the Trigger box and choose the HubSpot app.

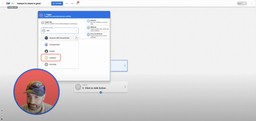
Select the event New Contact, then click Continue.

Click Sign in to connect your HubSpot account if you haven’t done so already. For help, follow our step-by-step guide on how to connect HubSpot to Workload. Once connected, click Continue.
Click Test Trigger to pull in sample contact data.
Once you receive a successful test response, click Continue.
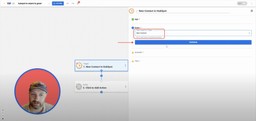
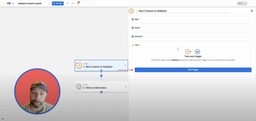
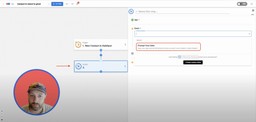
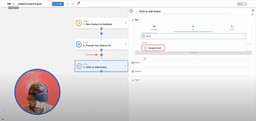
Step 3: Generate the Personalized Email (AI Wizard by Workload)
Click into the action step, then select AI Wizard by Workload from the TOOLS menu.
Choose the event Prompt Your Data, then click Continue.

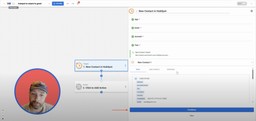
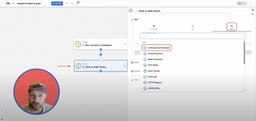
In the Input Data field, select First Name and Last Name from the HubSpot trigger.
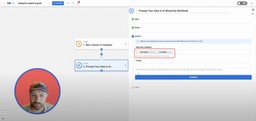
In the Prompt field, write a prompt like: “Write an email to this person expressing excitement about connecting and looking forward to working together”. Then click Continue.
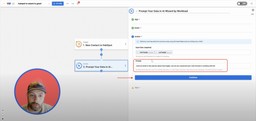
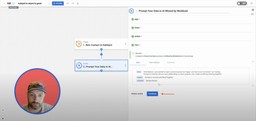
Next, click Test Action to review the generated subject and body text.

Once your test returns a clean, natural email, click Continue.
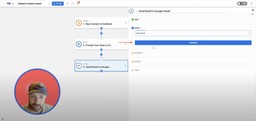
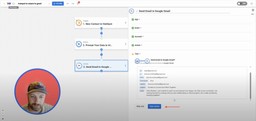
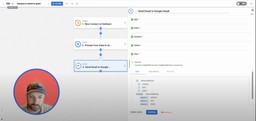
Step 4: Send the Email (Gmail)
Click the + icon to add a step and choose Gmail as the app.
Select the event Send Email, then click Continue.
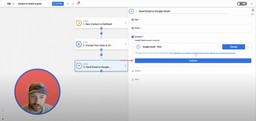
Click Sign in to connect your Gmail account if you haven’t done so already. For help, follow our step-by-step guide on how to connect Gmail to Workload. Once connected, click Continue.
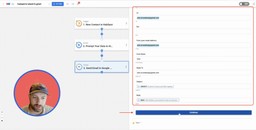
Now, customize the fields you want to include in your email:
- To → Email (from HubSpot Trigger)
- From → Your Gmail address
- Reply-To → Your Gmail address (optional)
- From Name → Your name or business name
- Subject → Subject (from AI Wizard)
- Body → Email Body (from AI Wizard)
Once you have finished creating your email, click Continue.

Next, click Test Action to send a test email.
Open your Gmail Sent folder to confirm it was delivered correctly. Once confirmed, go back to the Workload Editor and click Continue.

Step 5: Activate Your Automation (Workload)
Review each step to make sure all test lights are green. Click the On/Off toggle in the top-right corner to activate your automation.
* Your automation is now live! Every time a new contact is created in HubSpot, AI Wizard will draft a personalized email and send it automatically through Gmail.
🎨 Make It Yours
Want more flexibility or a personal touch? Try these customization ideas to make your Send Personalized HubSpot Emails automation work exactly how you want it.
🎯 Tailor the Message Tone
Adjust your AI Wizard prompt to sound friendly, formal, or consultative depending on your audience or industry.
🏷️ Add Lead Context
Pull HubSpot fields like company name, lifecycle stage, or source into your AI prompt for smarter personalization.
📅 Delay the Send
Add a short time delay before the Gmail step to space out follow-ups and avoid appearing automated.
📎 Track Internal Visibility
CC your sales manager or Slack channel so your team can see which contacts are receiving welcome emails.
🌐 Expand This Automation Into a Complete AI-Powered Relationship System
Now that you are sending personalized HubSpot emails automatically, you can evolve it into a full relationship management system. These enhancements create an ongoing loop that tracks communication, measures engagement, and deepens client connections over time.
💌 Log Every Message in HubSpot
Record each AI-generated email in the contact’s timeline so your team has a complete communication history.
📊 Analyze Replies with AI Wizard
Use AI Wizard to summarize incoming responses and highlight sentiment, urgency, or next-step opportunities.
🚀 Trigger Smart Follow-Ups
When AI detects positive interest, launch follow-up automations—like scheduling a meeting or assigning a task in HubSpot.
📈 Measure Engagement Trends
Send summary reports to Google Sheets or Slack showing how many contacts replied, opened, or converted from your outreach.
📚 Core Resources
🎓 Workload University
Deep-dive video tutorials and automation strategies.
🆘 Workload Help Center
Step-by-step help documents for all things Workload.
📋 HubSpot Tutorials
Short guides on how to automate tasks in HubSpot.
📊 Gmail Tutorials
Explore guides for additional Gmail automations.
✨ Popular Related Automations
⚡💬 HubSpot to Slack | Share New Contacts
Notify your Slack team when new HubSpot contacts are added.
🎫📊 HubSpot to Sheets | Log Support Tickets
Record HubSpot tickets automatically in Google Sheets.
📧🤖 Calendly to Gmail | Send AI Emails
Email new Calendly invitees with AI-written follow-ups.
✉️🌐 Gmail Translation | Resend Non-English Messages
Translate and resend foreign-language emails automatically.
🎥 Video Walkthrough
Tags
Ready to automate your workflows?
Start building powerful automations with Workload today.
Get Started Free