Connect and integrate Kucoin Futures with Google Sheets
Workload Team
February 16, 2022
Create an automated workflow with Workload’s easy to use no-code drag and drop tool to connect your Kucoin Futures API data to Google Sheets.
Automate your Kucoin Futures trading operation and easily setup dashboards and custom monitoring systems in Google Sheets. Create your own custom Kucoin Futures API and Google Sheet integration in minutes.


Make your life easier with your own integration between Kucoin Futures and Google Sheets
Using the power of no-code technology, Workload lets you automate workflows between Kucoin Futures and Google Sheets.
Get started right now for free. Paid plans starting at $49/mo and scale with your usage. Receive expert guidance and onboarding to build your perfect workflow. Automate your crypto trading operation. Create custom dashboards and alerts.
How to Integrate Kucoin Futures with Google Sheets in just a few clicks
- ✅ Authenticate Kucoin Futures and Google Sheets
- ✅ Select a trigger that will kickoff the workflow
- ✅ Choose the action you want to complete
- ✅ Map the data fields you want to pass from one app to the other
- ✅ If you get stuck, we’re here to help! Request help in our expert automator service market.
Step 1: Create A New Workflow
Log into your workload.co account and create a new workflow by clicking the big blue “CREATE WORKFLOW” button in the top left corner. If you don’t already have an account, go to https://automate.workload.co/auth/signin and create a free account. There’s no cost to get started.

Step 2: Name your Workflow and Setup the Trigger Node to pull data from Kucoin Futures API every minute and store the data in Google Sheets
First, click into the Title section in the top bar and type in a name for your workflow i.e “Kucoin to Google Sheets.”
Second, click the Trigger Node that says ‘Click to Add Trigger’ to open the Trigger setup and configure a task scheduler so that we can fetch the Kucoin Futures data every minute.

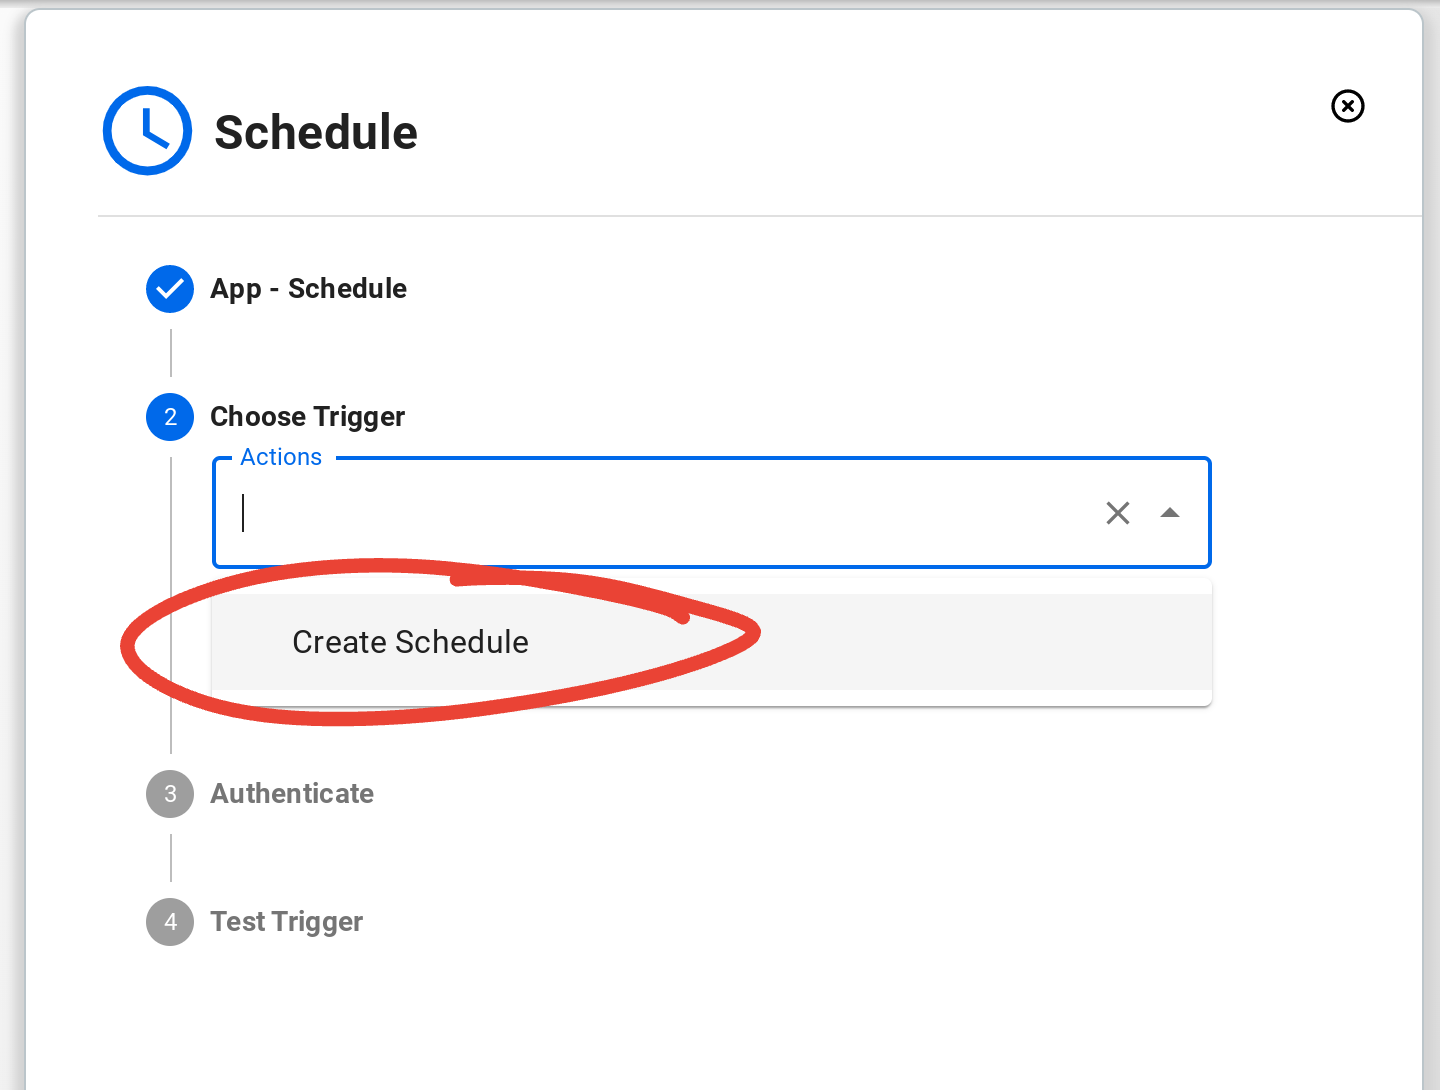
Once the “Add Trigger” dialog opens, choose the ‘Schedule’ trigger. The schedule trigger allows you to tell workload how often you want to fetch new Kucoin Futures data and send to Google Sheets.

Choose the ‘Create Schedule’ Action from the Step 2 – ‘Choose Trigger’ dropdown.
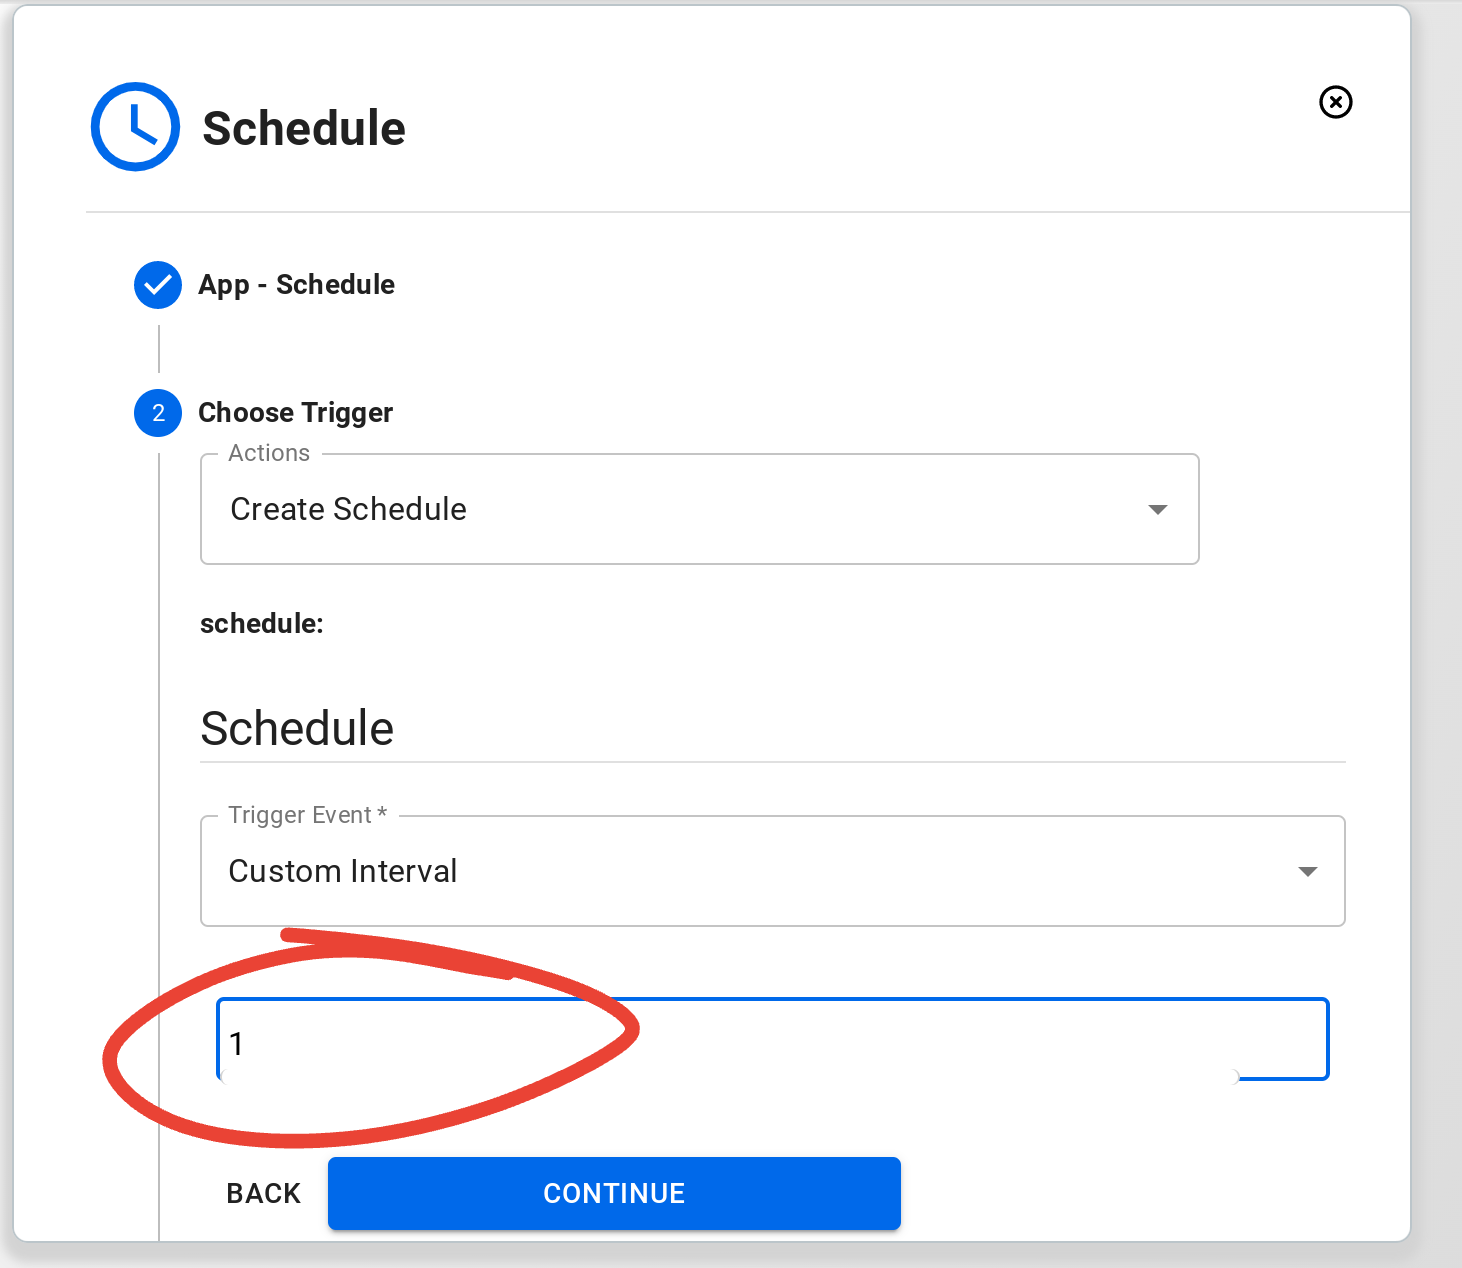
Choose ‘Custom Interval’ from the ‘Trigger Event’ dropdown.

Enter the interval, in minutes, indicating how often you want your Kucoin Futures API data to be pulled into Google Sheets. In this example, we will update prices every minute.
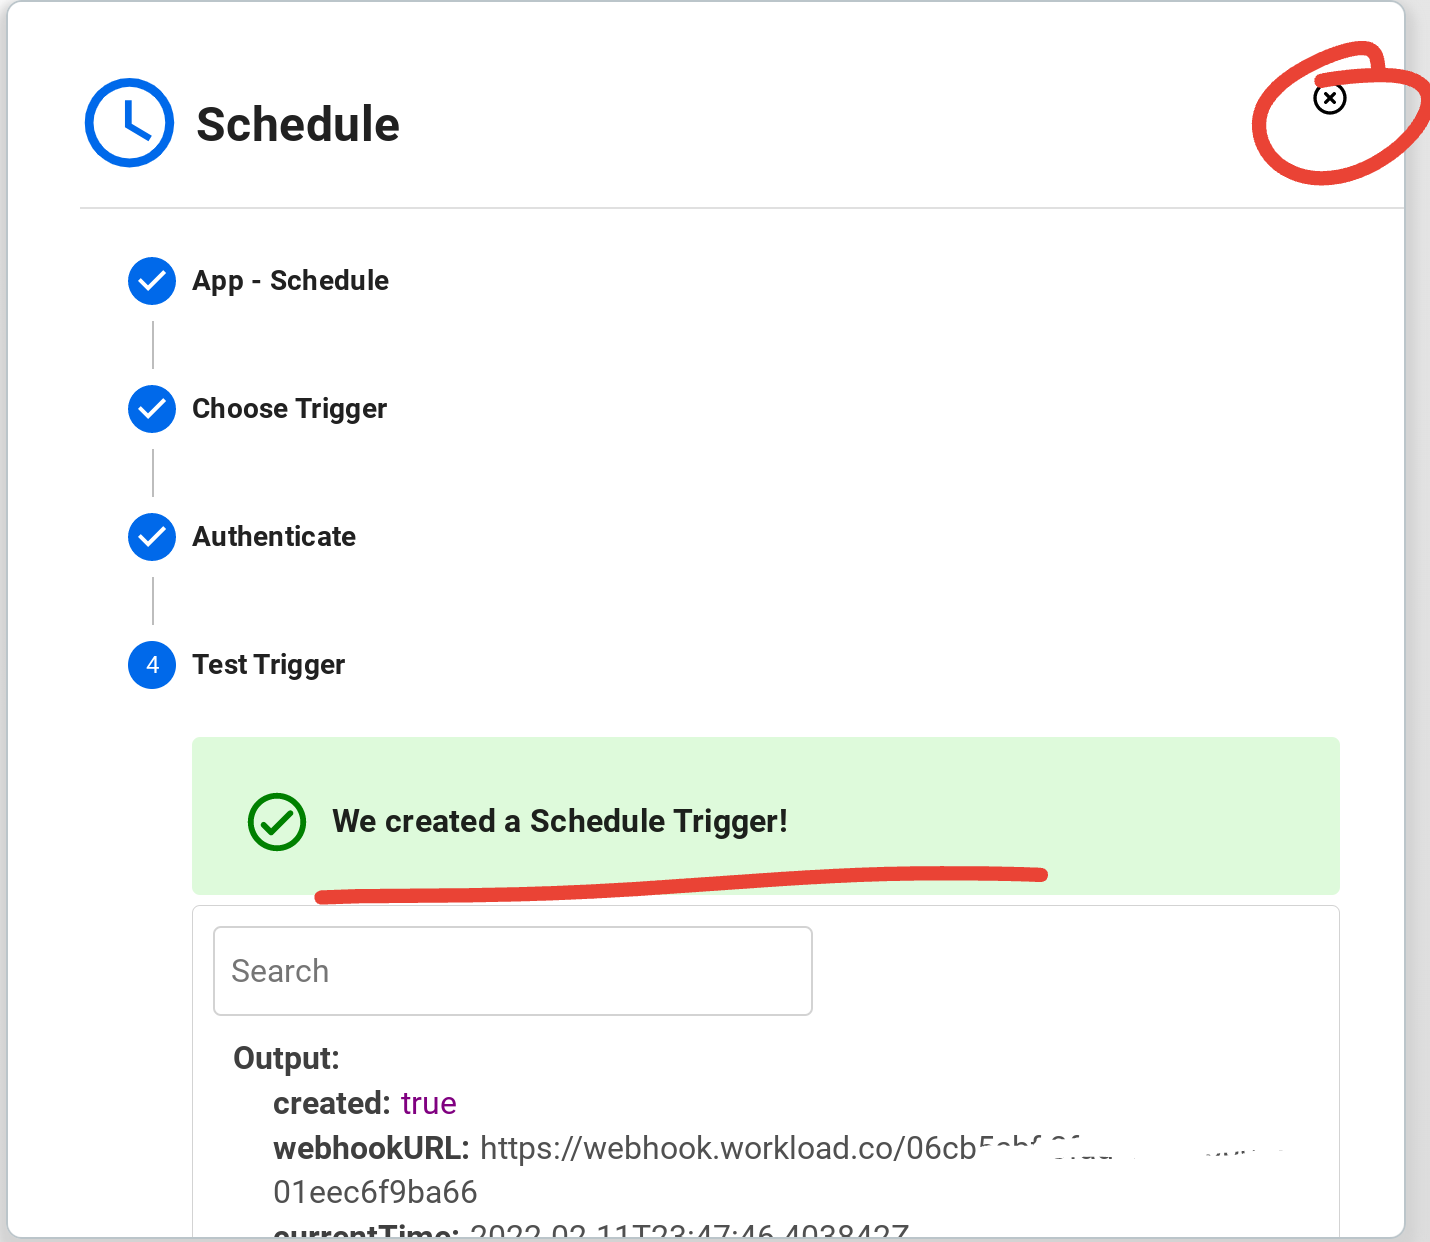
Click the blue Continue button, then wait for the green confirmation message “We created a Schedule Trigger!” to appear at the bottom of the screen. Congratulations! You’ve now completed setting up your Schedule trigger. You can now close the dialog by clicking the x circle in the top right corner.
Step 3: Setup the Kucoin Futures API Action Node to fetch data from Kucoin Futures
Click on the second node in the workflow titled “Click to Add Action.” This will allow you to configure the first step in your workflow that we’ve setup to run every minute.

Type in ‘kucoin’ to filter the list of apps and choose the Kucoin Futures API app from the list.

Choose “Custom Endpoint” from the dropdown. The custom endpoint is designed to be flexible and will allow you to make any GET request you want via the Kucoin Futures API.

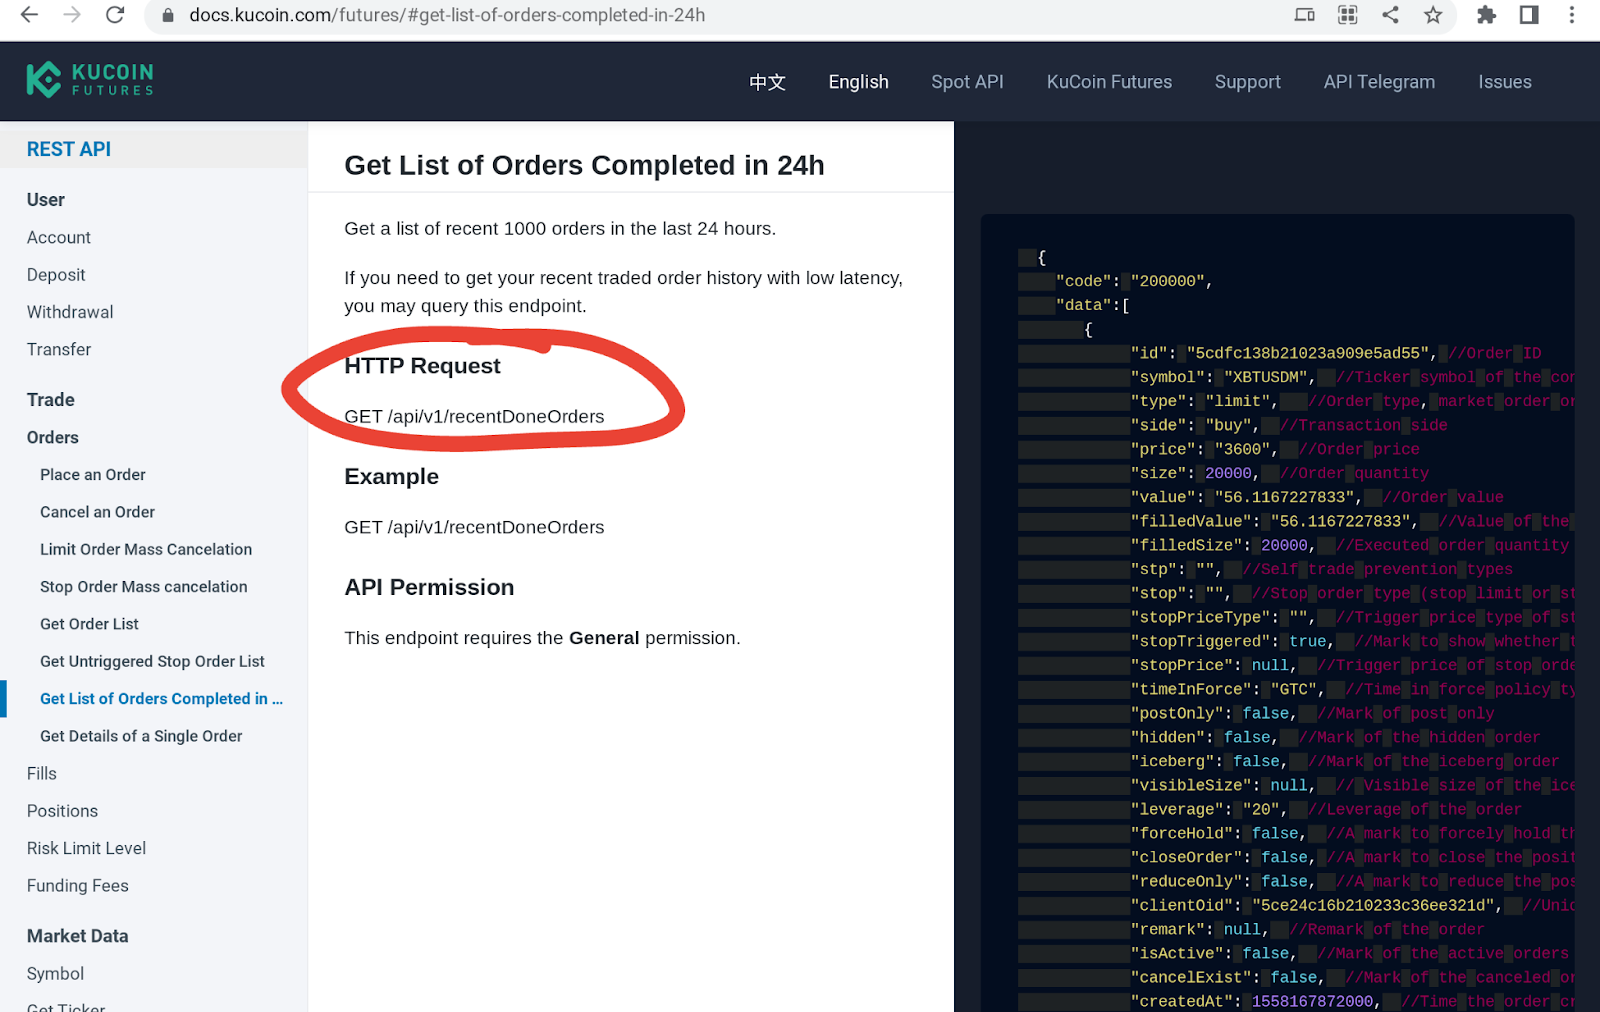
Now go to the Kucoin Futures API site and look for the data that you want to fetch. We are looking for GET commands. In this example, we are going to pull the “Get List of Orders Completed in 24h” data. Copy the request path text after the GET in the HTTP Request section. For example here we will copy ‘/api/v1/recentDoneOrders’ to the clipboard so we can paste it in the next step.
Paste the HTTP Request GET path into the ‘endpoint’ field as shown below, then click the blue Continue button to complete step 3 – Set Up Action.

In step 4 – Authenticate, we will connect to our Kucoin Futures account via the API key. Click the blue ‘Add a new Kucoin Futures API account’ button. A screen will popup for entering Kucoin Futures API credentials into. Leave this screen open so we can fill it in after fetching this data from the Kucoin Futures website.

Go to the Kucoin Futures website and access the ‘Futures API’ settings page.
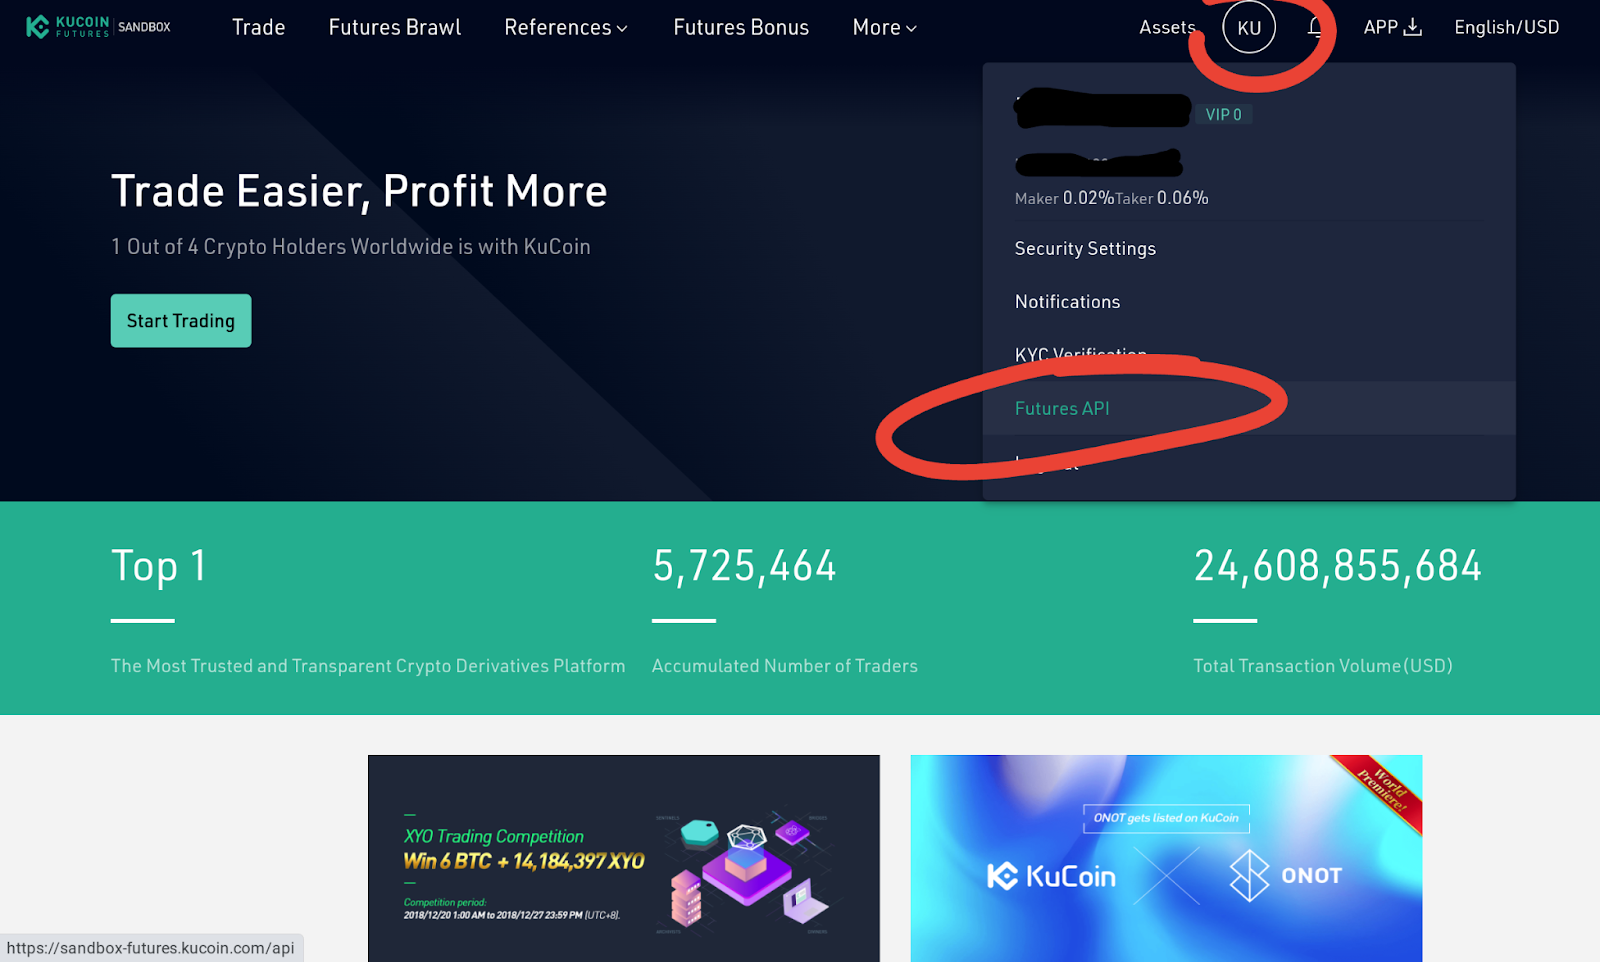
Click the ‘Create’ button.

Setup a name and password for your Kucoin Futures API connection. Be sure to record the password as it will be used in a later step. In the API Restrictions, it’s recommended to only check “General” in the “API Restrictions” section, as this is safest and most likely covers the data requests you’ll be needing. DO NOT CHECK WITHDRAW! You must leave IP Restriction set to No Limit so that the workload cloud based servers can access the API without being blocked.

Now let’s go back to the workload editor’s popup screen for Authenticating your Kucoin Futures Account (screenshot below – this is accessed in Step 4 – Authenticate). Fill in the API Key, Secret, and Passphrase from when you created the API above. You may choose the Production or Sandbox API environment depending on which side you created your API keys on. You can also choose whichever version of the API you want to connect to v1 or v2 here. Click the blue “Yes, Continue” button when complete.

The new Kucoin Futures API connection will now be shown in the Account list, and can be used in other workflows. Click continue to move on to step 5 – Test Action.

Click the blue ‘Test Action’ button to make a test request to the Kucoin Futures API endpoint that you setup in Step 3 – Set Up Action.

If you setup your API settings, credentials, and endpoint correctly, you should now see data in the bottom of the Test Action window. You will also be able to see errors here and troubleshoot. You can come back to this step and test again if you need to solve connectivity problems. Click the blue “Save & Close” button to proceed.

Step 4: Clear data from Google Sheets prior to updating with new Kucoin Futures API data
Click the plus sign at the bottom of the Kucoin Futures API node to add a new action node.
Choose Google Sheets app from the App Selector dropdown.

Choose “clear” from the Actions dropdown.

Enter the details about the sheet you want to paste the data into in Step 3 – Set Up Action.

The sheet name is the name of the tab (bottom left).
The spreadsheet ID comes from the URL of your sheet. Copy the blue highlighted identifier in the screenshot below. https://docs.google.com/spreadsheets/d/COPY-THIS-TEXT/edit#gid=123456

Connect Workload to your Google Sheets account by clicking the blue connector button and authenticating the connection.

Click the blue Test Action button in Step 5 – Test Action and you should now see a preview of your data as shown in the screenshot below. You can test that this step is working by entering data onto your sheet and clicking the Test Action button, then you should notice the data being cleared from the sheet. After testing, click the blue “Save & Close” button at bottom to proceed.

Step 5: Setup the Data Looper Action Node to process each row of data in the Kucoin Futures API response
Because we are grabbing multiple rows of data and appending to our google sheet, we need to use a helper tool called a Loop, which iterates each of the objects fetched from the Kucoin Futures API and processes them one by one. Add a new action to your workflow by clicking the plus button at the bottom of the Google Sheets node that you just completed setting up.

Type ‘loop’ and find the ‘Start Loop’ function in the Step 1 – Search for an App dropdown

Choose the startLoop action in the Step 2 – Action – Choose Action step.

In Step 3 – Set Up Action click the Kucoin Futures API node reference to expand it. Here you’ll see the data that you fetched when testing the Kucoin Futures API step.

Scroll down and select the data node by hovering and clicking it when the “data:” array object in the JSON Schema is highlighted with blue.
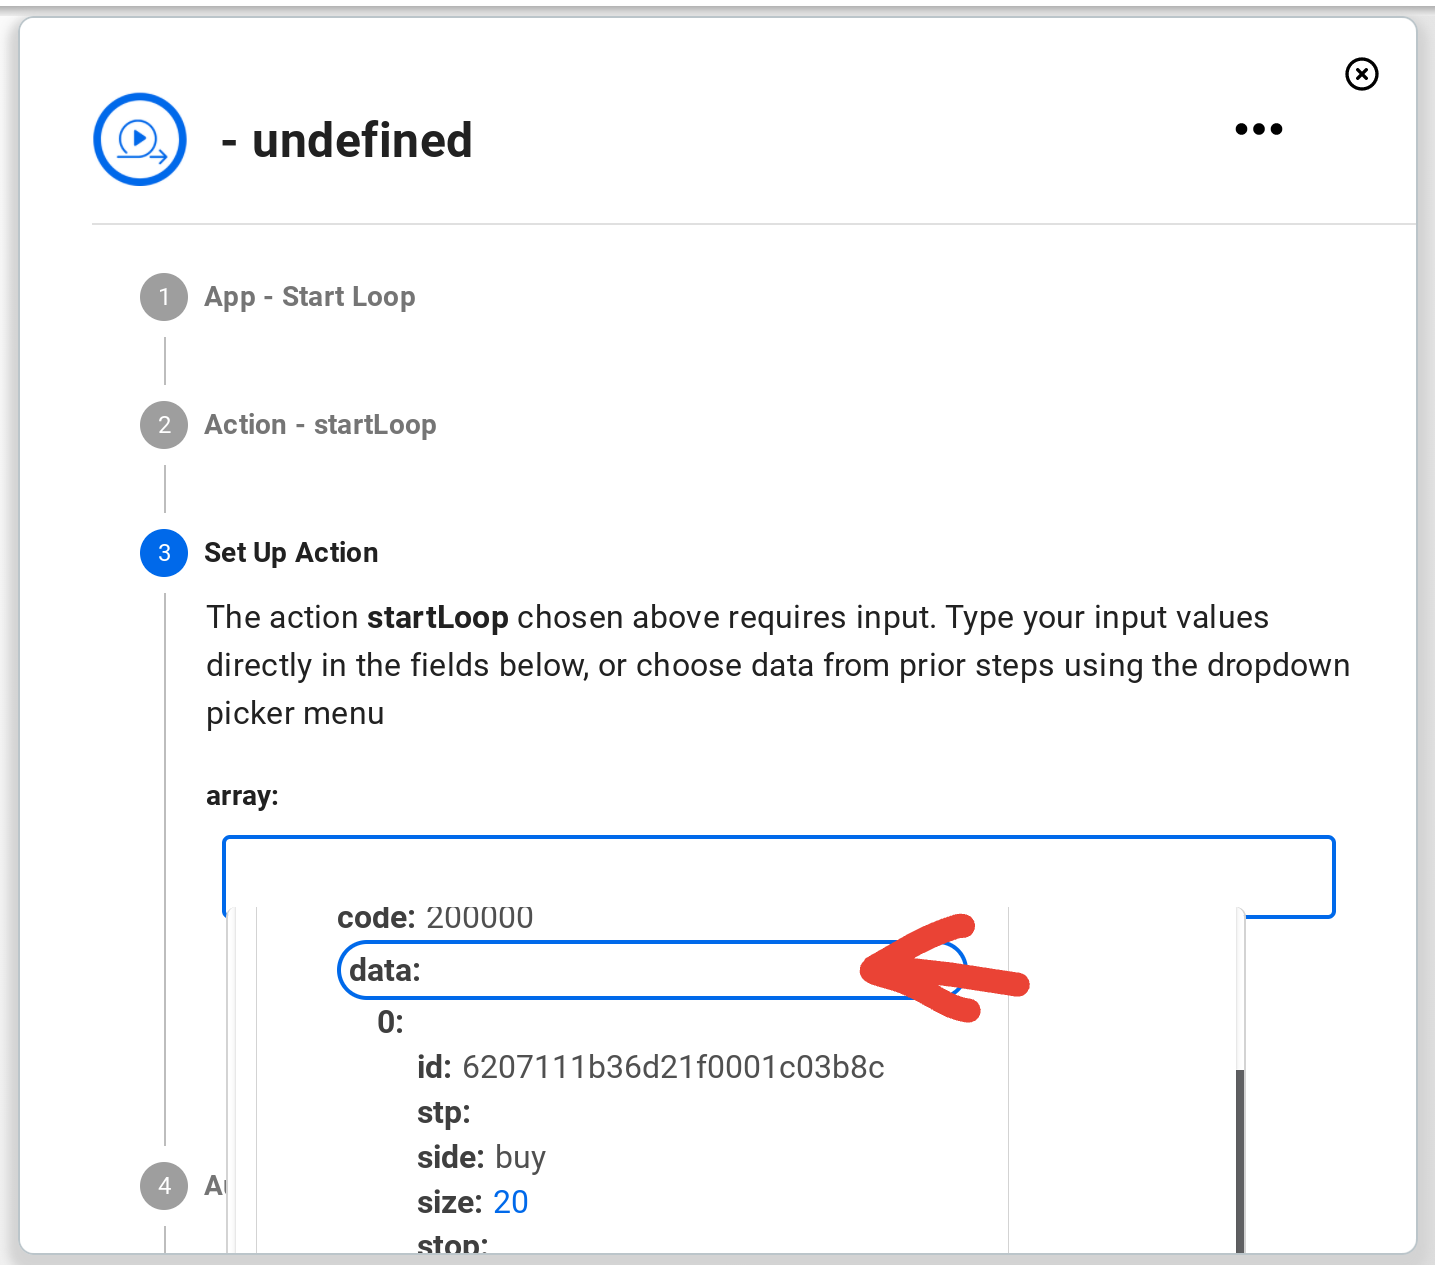
Click the blue “Continue” button to proceed. You should see your data show up in the array field. Note if there is a lot of data it may take a while to appear Click continue to proceed.

Click the blue Test button in step 5 – Test Action and you should now see a preview of your data as shown in the screenshot below. This is the data that you’ll be mapping to the Google Sheets rows in the following steps. Click the blue “Save & Close” button at bottom to proceed.

Step 6: Setup the Google Sheets append data step to paste data from the Kucoin Futures API step
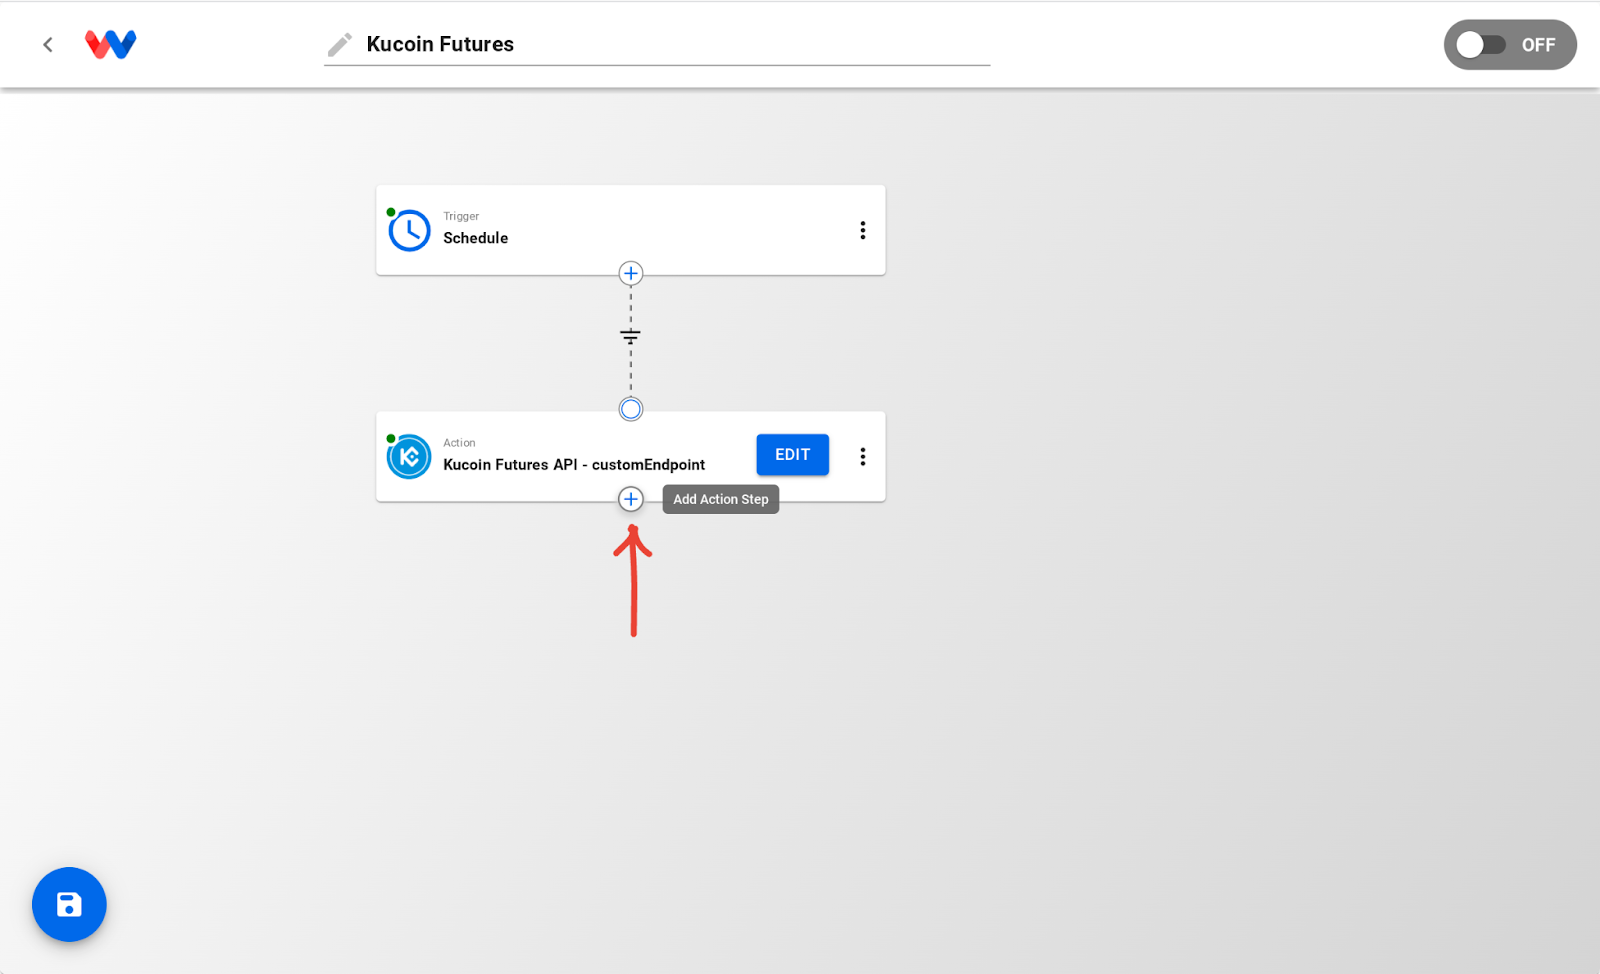
Click the plus sign at the bottom of the Loop step to add the final Google Sheets append data node.

Select Google Sheets from the dropdown in Step 1 – Select App.

Choose the append action from the dropdown in Step 2 – Choose Action.

Enter the Spreadsheet ID and range where you want to paste data to in the fields. In the example below we are going to put data in the ‘Orders’ sheet, with headers on the top row, so we start at A2. Our range is a combination of the sheet name and the range, ‘Orders’!A2:Z you can change ‘Orders’ to whatever your column name is to reference a different sheet. Click the “ADD ITEM” button in the bottom right corner to add data fields into the Google Sheets file.

Click the “+ ADD ITEM” button to start mapping fields.


In this example we will be populating three fields. ID, Side, and Size.

Type the column header into the first box. In this example, we are mapping column A in our excel sheet, so we type the header “ID” in the box. Then click the ‘Start Loop’ dropdown in the second box to choose the data.

Pick the data from the list. In this example, we want the ID data to be mapped to the “id” field in the Output, so we click the id field highlighted in the screenshot below.

Use the same process as outlined above to map the Side and Size columns, as shown in the screenshot below.

Click the blue Continue button. On the Authenticate step, you should have a Google Sheets connection already established from when we setup the Google Sheets clear contents step, so choose that existing connection from the list and you won’t have to repeat the Authentication process.

Click the Test Action button to test sending the first row of data.

It may take a few seconds to show up, but you’ll see the response from the action in the bottom section of the window, as shown in the screenshot below. Click Save & Close when you’re done testing.

You should now be able to look at the Google Sheet and see the data populated for the first row of data. (Note, you will only see one row at this stage)

Step 7: Activate the workflow to start fetching data from Kucoin Futures API every minute and sending all rows of data to Google Sheets
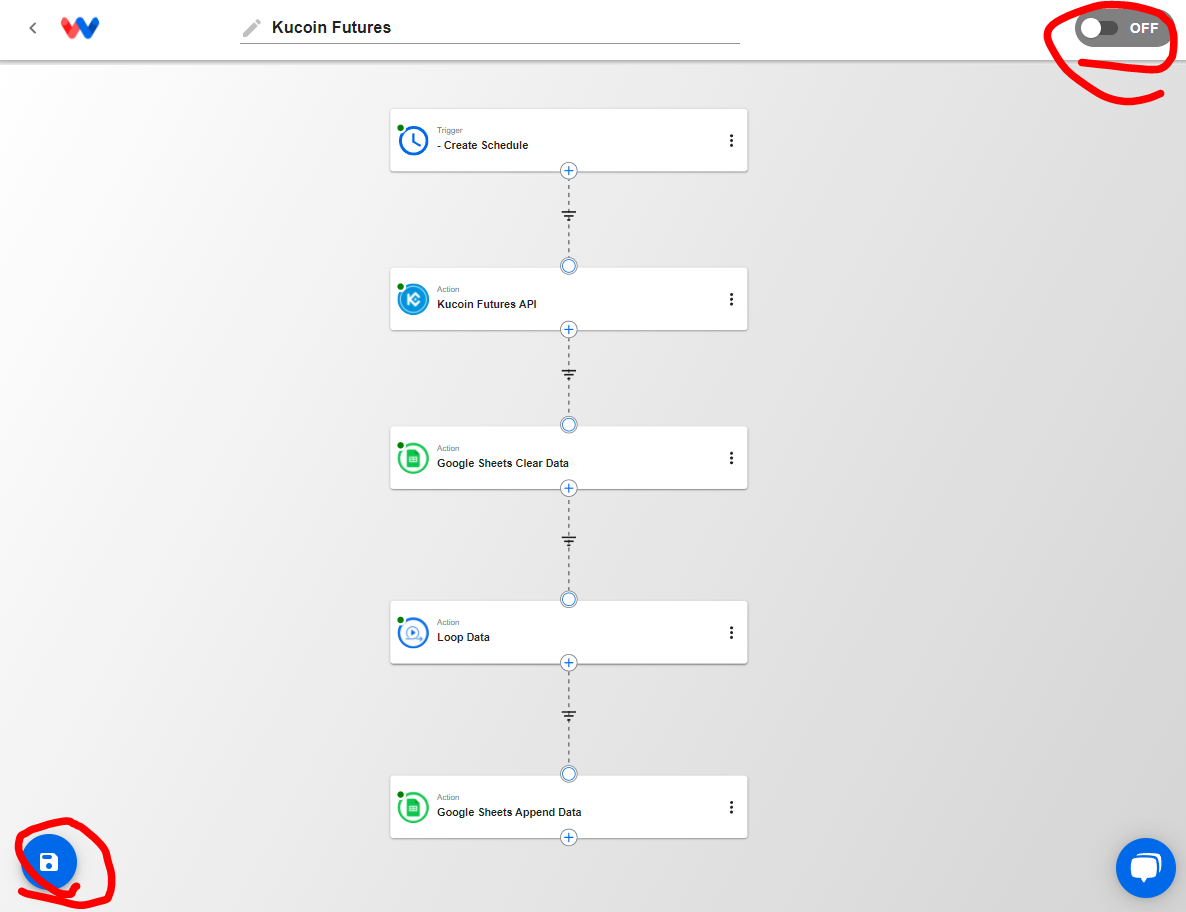
Congratulations! You’ve finished setting up your workflow to pull data from Kucoin Futures API and send it into Google Sheets. Now click the save button in the bottom left corner to save your work.
Click the On/Off toggle button in the top right corner to activate the workflow. Your data should now update every minute, fetching new values from Kucioin Futures API and replacing the data in Google Sheets. When the top right slider is green and says ON, your workflow will begin executing every minute.
After the first minute cycle, you should be able to see all rows of data populating into Google Sheets.

Your sheet will update on the interval you specified in the Trigger setup as long as it’s turned on. You can turn it off when not in use to save operations.
What is Kucoin Futures?
Kucoin Futures is the easiest, safest, most transparent, and user friendly Bitcoin Litecoin trading platform, offering cryptocurrency perpetual contracts. 100x leverage, no overloads, free bonus, 24/7 online support. Most secure and rapid.
What is Google Sheets?
Google Sheets is an online spreadsheet making tool that helps in creating, editing & sharing spreadsheets in real-time through any PC, mobile or tablet. Create, edit, and share spreadsheets wherever you are with Google Sheets, and get automated insights from your data.
What users say about Workload
Workload has made it easier for me to visualize and bring to life ideas I have for automated workflows with Kucoin Futures. You can jump right in and start integrating almost any software app.
Ready to automate your workflows?
Start building powerful automations with Workload today.
Get Started Free