Skip to content
Workload – Automation Software
  • Product
    • Solutions
      • Automate Your AdOps
      • Automate Your HR & Recruiting
    • Integrations
    • Company
      • Blog
      • Integrations
      • Apps
      • Case Studies
      • Experts
      • About
        • Privacy
        • Terms of Service
  • Resources & Support
  • Pricing
  • Login
  • Get Started

What can we help you with?

Getting Started

  • Workload Quickstart Guide
  • Automation 101

Creating Workflows

  • Create workflows
  • Loop through Workload actions

Managing Workflows

  • Connect an account to Workload
  • How to copy from one workspace to another
  • How to initialize a workflow after copying
  • How to share a workflow as a template with anyone

Partner Integrations

  • How do I enable and use the Lever integration?
  • How do I enable and use the Webex integration?
  • How do I enable and use the Zoom integration?
  • How to set up the DrChrono integration with Workload
  • How to find your PEP Cloud (Painter’s Estimating Program) API Key

Utilities

  • Loop through Workload actions
  • Home
  • Docs
  • Partner Integrations
  • How to set up the DrChrono integration with Workload

How to set up the DrChrono integration with Workload

Table of Contents
  • Enable the Workload <> DrChrono integration - video tutorial
  • Step 1: Create a new application in DrChrono
  • Step 2: Connecting Workload to DrChrono

The DrChrono to Workload integration allows you to connect DrChrono with hundreds of popular business applications to build automated workflows for your team or company.

Enable the Workload <> DrChrono integration – video tutorial #

Step 1: Create a new application in DrChrono #

In order to use Workload’s integration with DrChrono, you must first create a new application inside of DrChrono’s dashboard page. This step only takes a few minutes if you follow these simple instructions:

  1. Go to your DrChrono dashboard page by visiting https://drchrono.com/dashboard
  2. Hover your mouse over the “Account” menu and click “API”
  3. Click on the green “+New Application” button
  4. Give your application a name (ex: “Workload <> DrChrono Integration”)
  5. Put this URL in the field labeled “Redirect URIs”
    https://editor.workload.co:5000/auth/drchrono-com/redirect
  6. Click on “Save Changes”
  7. Click “Show” and “Copy” on the Client ID field. Paste the copied value into a document to reference later. Do the same for the Client Secret field.

Step 2: Connecting Workload to DrChrono #

Now that you have copied and pasted your DrChrono Client ID and Secret into a safe place to reference later, you are ready to connect your DrChrono account to Workload. This allows you to extract and load data into DrChrono from other applications such as Slack, Teams, Jotform, and Google Sheets.

  1. Go to your Workload dashboard page by visiting https://automate.workload.co and logging in or creating a new account if necessary.
  2. Click on the blue “Create Workflow” button to enter the workflow editor tool.
  3. Depending on what your workflow needs, you may or may not set up DrChrono as a trigger. In this example, we’ll pretend our workflow will trigger when a new patient is added to our DrChrono account. Therefore, select DrChrono as the app, and then “New Patient” as the trigger event.

    Your setup would look like this if done correctly:
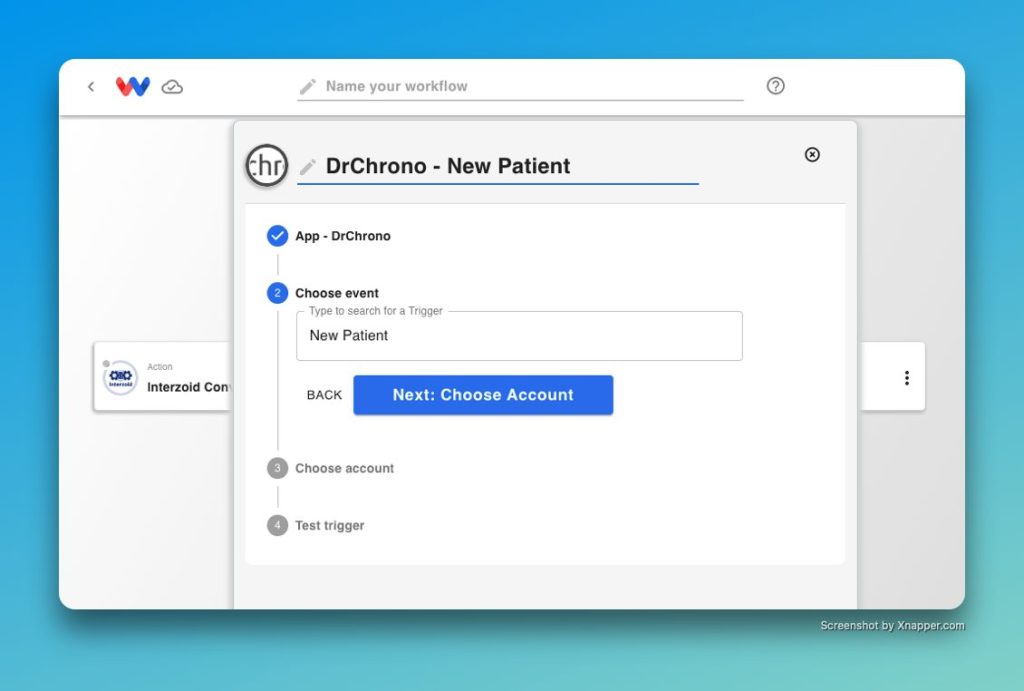
4. Click “Next: Choose Account” to advance to the next step
5. In the “Choose Account” step, click on the “Account” dropdown and then click the large blue button that prompts you to “Sign In” to DrChrono.

Your screen should now look like this:
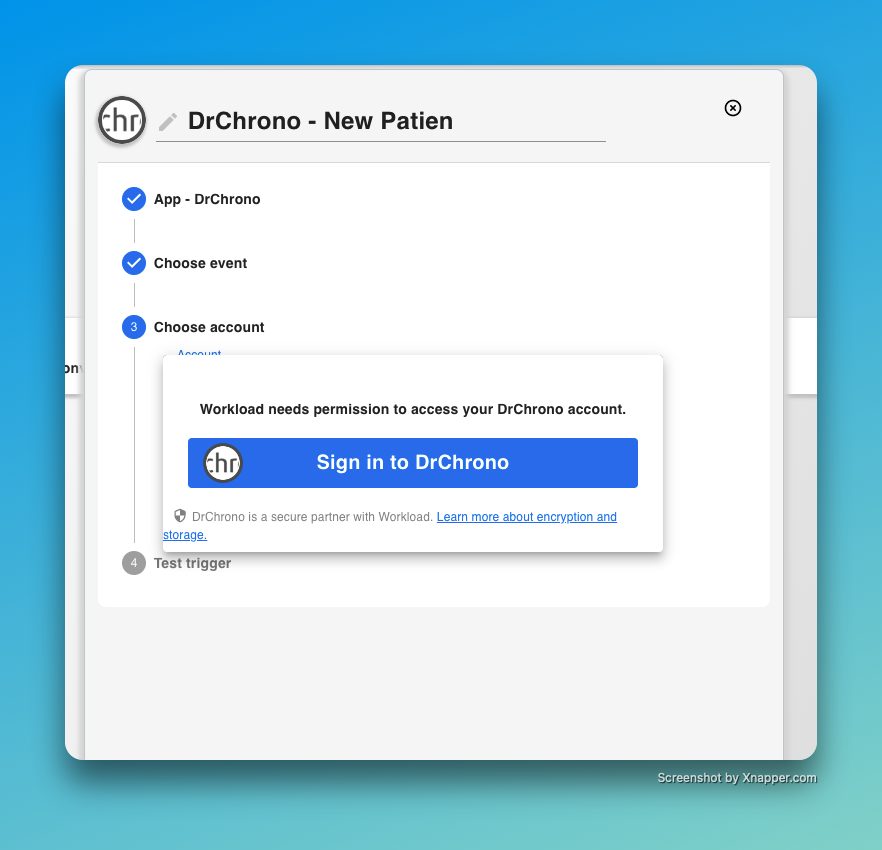
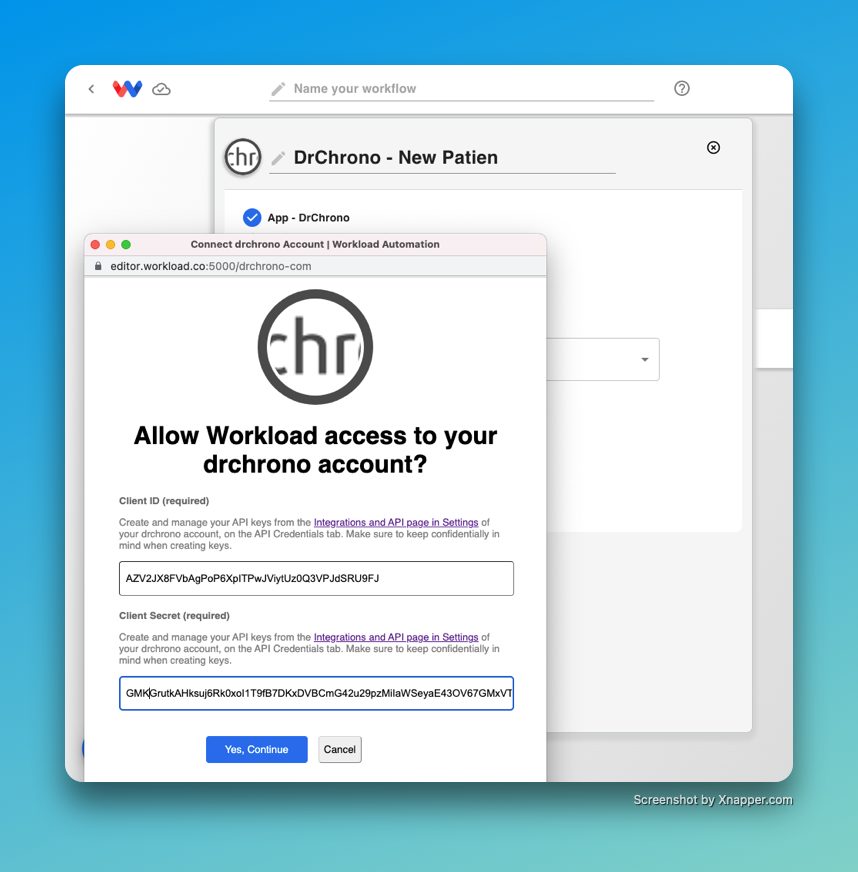
6. Once you click the “Sign In” button, you’ll be prompted to enter the Client ID and Client Secret from the earlier step when you created a new application in DrChrono. Enter those values into the respective fields and click on “Yes, Continue”

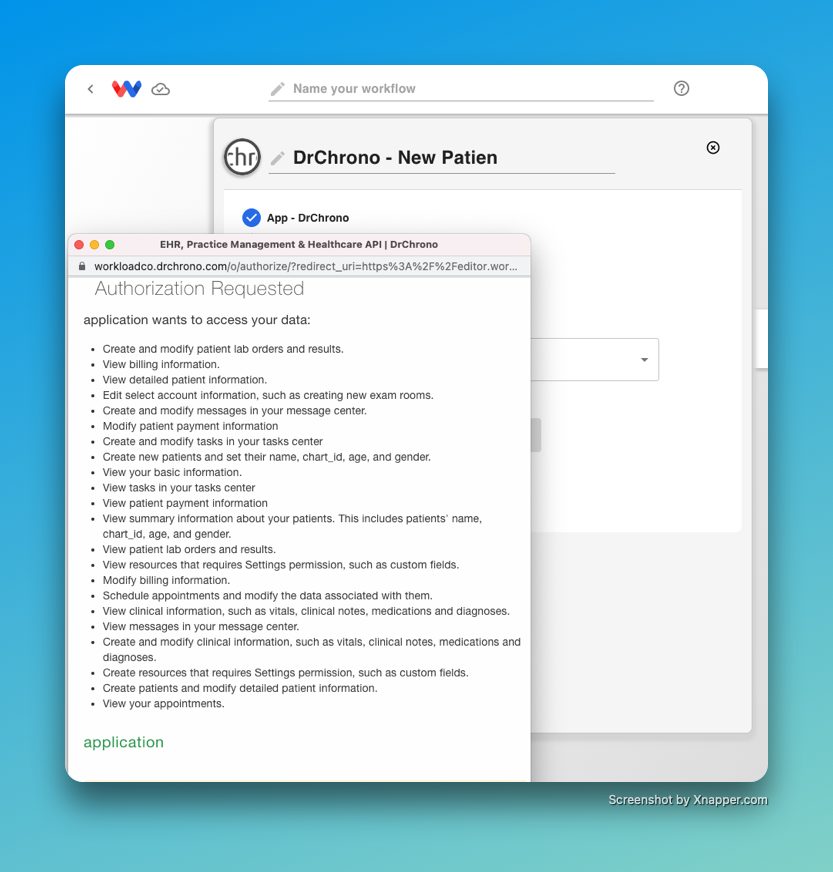
7. Once you enter your Client ID and Secret, press “Yes, Continue.” You will be redirected to the DrChrono authorization page. Scroll to the bottom and click on “Authorize”.
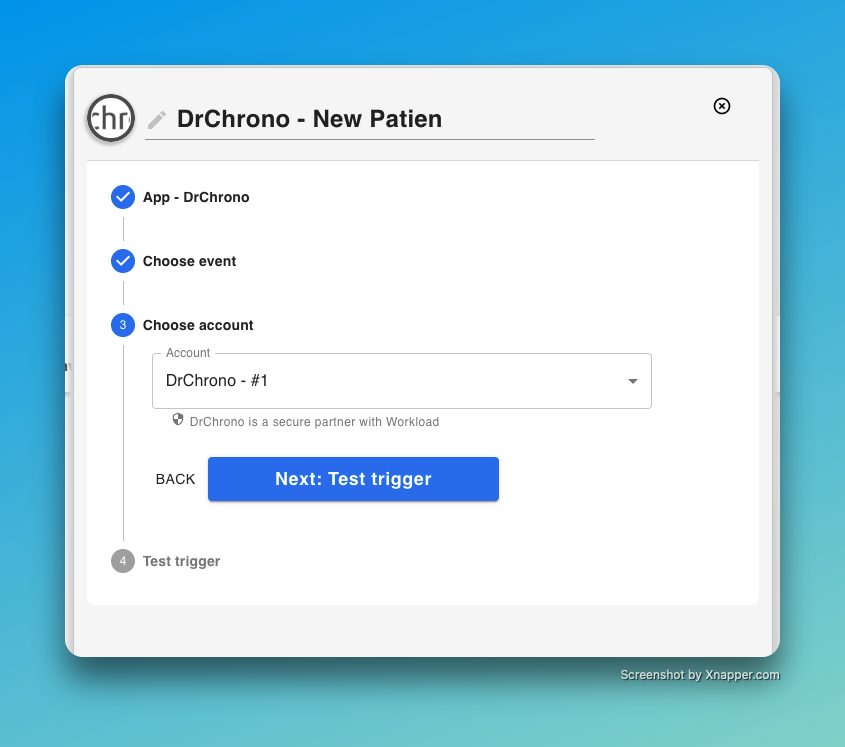
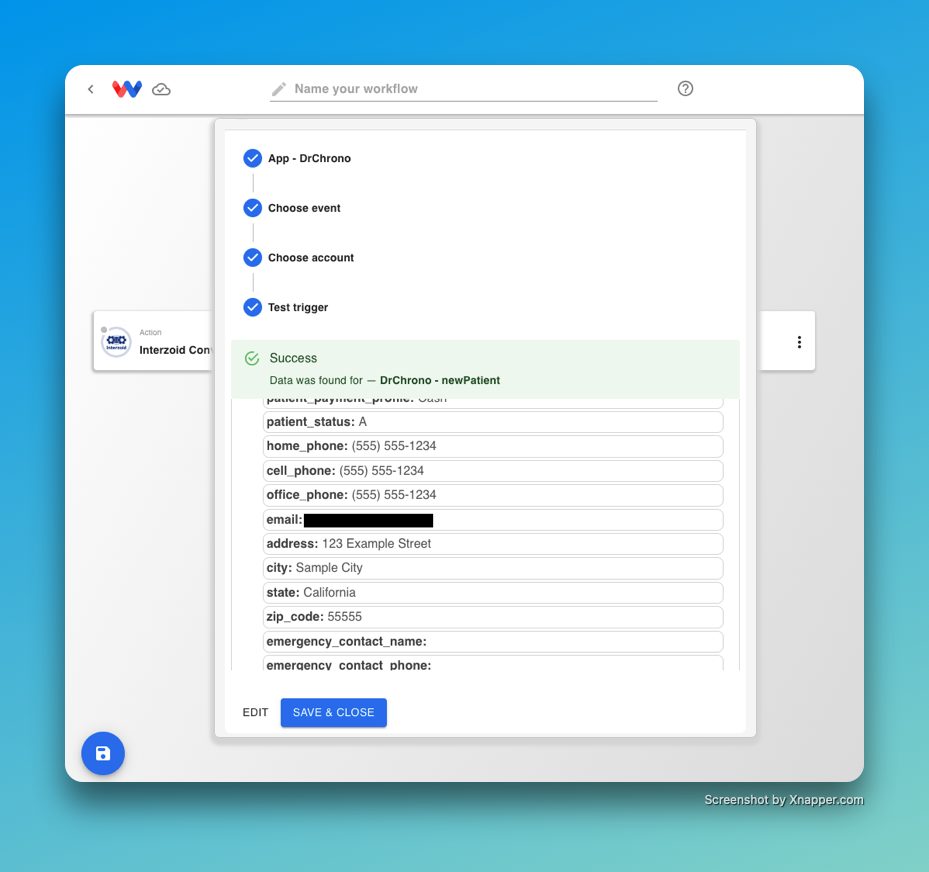
8. Once you click on the “Authorize” button at the bottom, the window will close and you’ll see the new account connection available to use. Click on “Next: Test Trigger” to load some sample data:
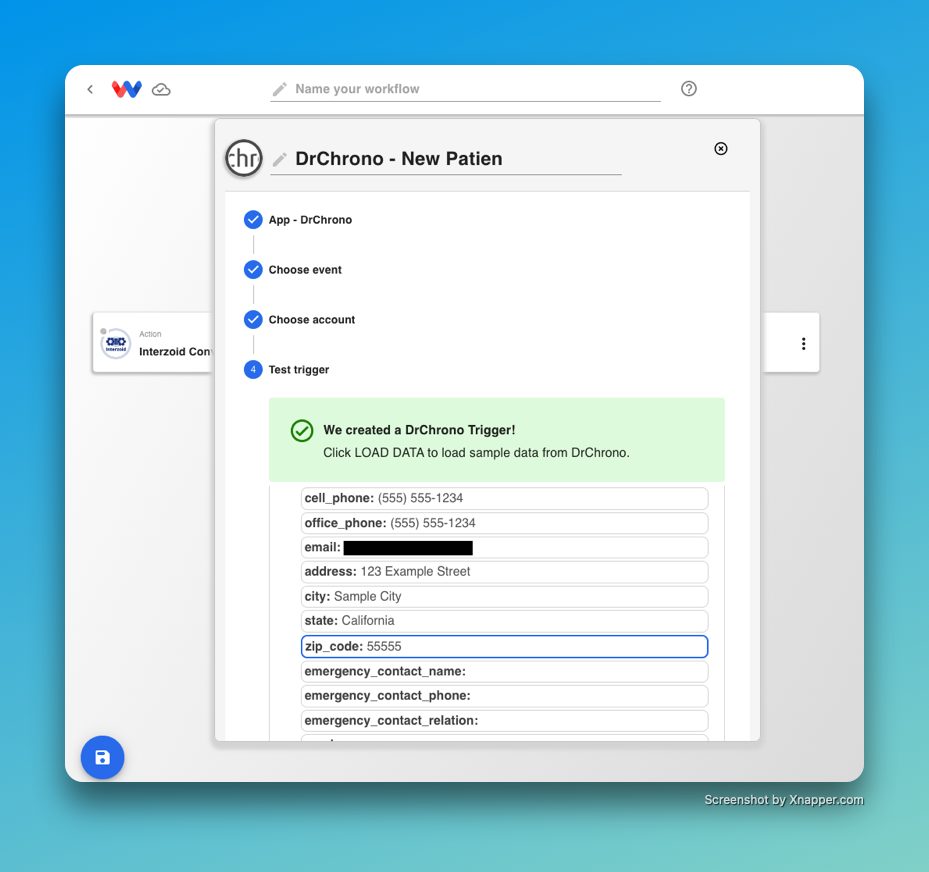
9. If you have patients in your account, Workload will find some sample data for you to use while building your workflow. Click on “Load Data” at the bottom of the step in order to load the data.
10. Lastly, click on “Save & Close” to save this step configuration and move on to building out your action steps. In the future, you won’t have to reconnect your DrChrono account again. It will available to use in the dropdown list of accounts, saving you time and effort while building your workflows!

Share This Article :
  • Facebook
  • Twitter
  • LinkedIn
  • Pinterest
Still stuck? How can we help?

How can we help?

Updated on July 4, 2022
How do I enable and use the Zoom integration?How to find your PEP Cloud (Painter’s Estimating Program) API Key

Powered by BetterDocs

Table of Contents
  • Enable the Workload <> DrChrono integration - video tutorial
  • Step 1: Create a new application in DrChrono
  • Step 2: Connecting Workload to DrChrono
Workload

Home

Product

Pricing

Templates

Privacy

Terms

About Us

Company

Leadership

Press

Workload Blog

Integrations

Google Sheets Integrations

Gmail Integrations

Amazon Integrations

Asana Integrations

Lever Integrations

Clio Integrations

Slack Integrations

ClickUp Integrations

ServiceTitan Integrations

See All Integrations

Support

Workload 101

Getting Started

Create a Workflow

Create a Trigger

Create an Action

See All Help Docs

© 2023 - workload.co - All rights reserved
This website uses cookies to improve your experience. We'll assume you're ok with this, but you can opt-out if you wish.OKReject Learn About PrivacyOK
Terms, Privacy & More

Privacy Overview

This website uses cookies to improve your experience while you navigate through the website. Out of these, the cookies that are categorized as necessary are stored on your browser as they are essential for the working of basic functionalities of the website. We also use third-party cookies that help us analyze and understand how you use this website. These cookies will be stored in your browser only with your consent. You also have the option to opt-out of these cookies. But opting out of some of these cookies may affect your browsing experience.
Necessary
Always Enabled
Necessary cookies are absolutely essential for the website to function properly. This category only includes cookies that ensures basic functionalities and security features of the website. These cookies do not store any personal information.
Non-necessary
Any cookies that may not be particularly necessary for the website to function and is used specifically to collect user personal data via analytics, ads, other embedded contents are termed as non-necessary cookies. It is mandatory to procure user consent prior to running these cookies on your website.
SAVE & ACCEPT